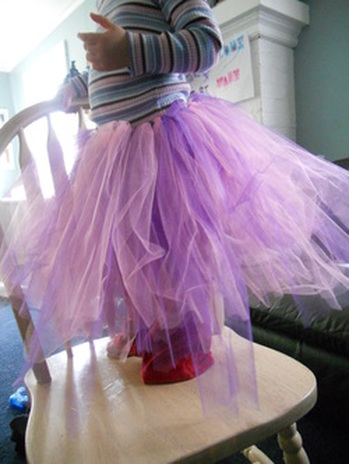
I saw this Purim project on creativejewishmom, where really, everything is
just very creative. 

I'm pretty sure we are hosting Purim at our house this year and so what
would be more helpful than a centerpiece, right? 

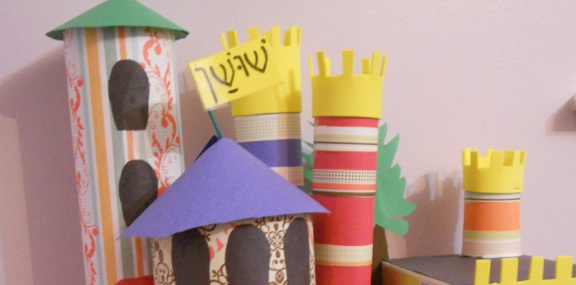
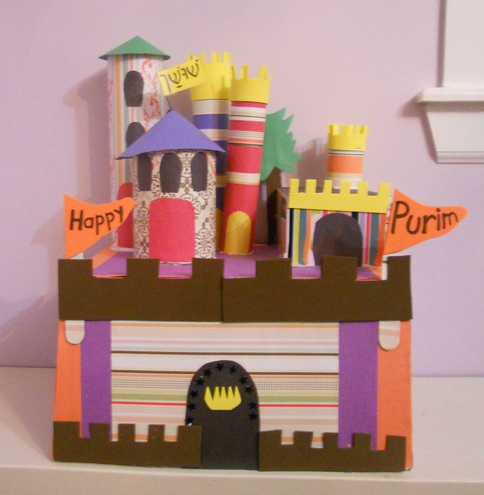
So we built a replica* of Shushan (the Persian city where the whole Purim
story takes place) out of boxes and things from our recycling closet.

What did we use, you ask? Excellent question.
The base was a medium sized cardboard bin from one of many apple-picking
trips. I turned it over and it made the perfect base for our city. 

The houses and palaces were made from a small shoebox, an empty breadcrumb
container, several paper towel rolls and an empty pringle canister. 

The rest of the project was made using colored paper, some half-used sheets
of scrapbook paper and several sheets of colored foamie papers. Throw in some
glue, safety scissors and a pencil (oh yeah, and four kids) and you're in for a
real party.

First I read all the directions from the original project. We used some of
creativejewishmom's ideas and some of our own, which is how it should be. Art is
not about copying, it's about interpreting - and that is my deep thought for the
day.

We cut, we glued, we colored, we decided it didn't look quite right, we had
to take away the scissors from some people and some of us had to leave the table
until we were ready to behave, listen and share, but the end result is pretty
darn cute. 
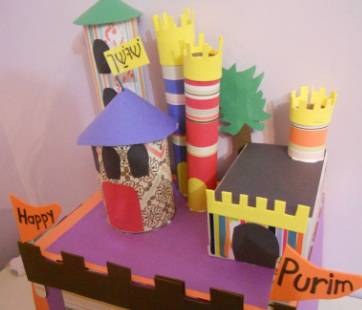
I really believe that when working on a project like this, that it's all
about the details. An extra flag, gates around the city, a chimney; it's all
about the cuteness factor, and really, anything made in mini is almost
automatically cute.

The first thing the kids wanted to do was play with it. I said no, they
said yes. So we compromised, instead of waiting until after Purim to play with
it, they will be allowed to play with it once a picture has been taken of
Shushan city on the table, all set for Purim. Deal. They think they got what
they wanted and I really got what I wanted. Isn't that the definition of good
parenting?


*When I say replica, I don't really mean that we replicated Shushan in
the strict sense of the word; that would be crazy. I just kind of mean that we
built some houses and palaces and we're making pretend that this is what Shushan
looked like. Really, I think it has more of an Aladdin kinda thing going on. And
that's okay.
 
 
Purim will be here in about five minutes so if you have not yet started thinking about your mishloach manot or costumes for the kids, you might want to get on that. 

In the spirit of helping, here are a few ideas we had last year - the good, the easy and the dismal failures. Enjoy! 
 
 
First of all, I have to say that I am thinking about investing is some plastic orange cones
to have on hand for when a stomach virus sweeps through the house because
apparently, when I loudly say, no one step over there, I am going to get towels,
no one hears me. And in that brief sentence, I have just told you about my weekend.

But to the point of this post, I believe that my oldest child may have some commitment issues.
His first grade teacher is having the class do a book share, where each child chooses and reads
a non-fiction book, a book in which he or she will learn something and share it
with the class. According to the instructions, the book can be chosen from "... 
biographies, cookbooks, gardening, science-related or a how-to book." So many
choices, so little time.

First he wanted to bake something - he looked through the three kiddie cookbooks
that we have in the house, choosing every cupcake recipe that featured frosting
and sprinkles. Great, we had a plan. 

And because he has a big heart (and big eyes) he wanted to bake enough cupcakes
so he could not only share the book but share the treats with his whole class.
Thing is, homemade food is not allowed to be shared inside the school. His rule:
No sharing cupcakes, no making cupcakes.

Next little boy idea: building something out of lego. Problem is, the instruction
booklet that comes with a box of lego is not a book. We searched Amazon
and googled and could not really find a book in the strict sense of the word. No book, no share.
We did, however, find a cool looking science related book on Amazon,
something about building machines using the enclosed batteries and coils
and wires and other metal things. Excellent, we had a book share path.

Once the book arrived, we quickly realized that this book was way above
first grade level; I wasn't understanding much of it. And as much as he wanted
to use the book, we kind of felt like if the book share was something that
Josh and I were going to do ourselves on a Saturday night after the kids
were in bed, then it wouldn't really be his book share. Lame? Yeah, because I
am sure most parents are doing their kid's book share, but I'd like to think that
the kids are helping at least a little. This battery book was definitely a no kid
required book, so that was out. Now I have (another) box on my porch waiting
to be shipping back to Amazon.


Then last Monday, we took a trip to Barnes and Noble and in the corner of the
kiddie section, there it was.

If the store hadn't be so crowded, I think I would have heard some angelic music
playing as the sun shown on the discount book shelf because sitting right there
was a book about making paper airplanes. And not only was it about making paper
airplanes, but it was packaged in a box with a stack of paper airplane paper.
Apparently these papers are specifically made for making paper airplanes. Who knew?

To make this very long story slightly less long, here's what happened, quickly.
We attempted to make every single airplane in the book and not one was easy
enough for a child to make.

But read the book we did. So it counts. And Josh, who really had had enough of all of
this way back when we were first discussing the possibility of a lego book,
decided that he was going to teach his child to make paper planes the way he did
when he was in first grade. So he did. And the little one learned. And there you
go.

We took step by step pictures of the first grader making the planes, glued them
onto a poster and done. The first grader sat down and wrote the requisite
five sentences about the book, drew his bookshare cover, and then went to play,
so happy that Mommy wasn't making him practice reading his bookshare out loud.

All I can say is that it's a good thing his teacher gives us a way more than a
month to put these book shares together - not because it takes that long to read and write.
That we do in an afternoon. It's the picking and planning that takes weeks. I'm scared to see
what's going to happen when the Purim-costume-changing-of-the-minds starts.
Should be happening in about five minutes.
 
 
The long-awaited day is here! My first grader is getting his chumash* today and his much practiced for chumash play is tonight - right in the middle of the younger kids' bedtimes and the older kids' bathrimes, but we won't go there.

For weeks and weeks, we have been practicing his part, listening to him sing all the songs and watching him as he learned a little more chumash each day, in preparation for the big day. Can you say nachas? Cause I can!

And you want to know how excited we are? I just turned the house upside down looking for my little flip video camera. Sometimes these things are just too mini for their own good. But my point here - if I couldn't find it by noon, I was ready to make a Best Buy run and buy a new one, any one they had. And I don't make these purchases lightly. Electronics are researched to the nth degree in this house before being bought.

Anyway, while I was turning the house upside down, searching, I saw this:
Not sure who did it, but I couldn't stop laughing. In case you can't tell, it says "First Grade Chumash Play". Love it!
 
Mazal tov big boy!

*The word chumash, is one of the Hebrew words that refer to the Five Books of Moses, or the Torah. Interestingly, the word chumash is related to the Hebrew word chomesh, meaning one-fifth, which can refer to any one of the five books that comprise the Torah.

Children begin to learn the
chumash at a young age, in my son's school's case, it's first grade. When the children receive their very own chumash for the first time, they generally put on a play for the parents and grandparents and everyone that their mom invites. And of course, there are cookies and drinks afterwards, otherwise what would be the point, right? I'm kidding. Kind of. I mean, really, it's all about the snacks, right?  
 
 
This might be the most awesome (and easy) birthday cake I have ever made.
Sadly, I did not think of the idea, I found it on a blog called Paige's Pantry, but I totally
wish I would have thought of it, it's that good of an idea.

We made our newly minted two-year-old a family party on Sunday with cousins
and grandparents and aunts and uncles and some friends. I was not in the mood
to do a whole big fancy cake and really, who needs such a big cake. We (Okay, I) should
be eating some carrot sticks anyway. I had a vague idea of wanting to make
some kind of cake decorated with candy because it seemed so
much easier than decorating with icing and frosting and molded chocolates and
things. So I googled, and shockingly, did not come up with much, until I hit the
jackpot with this kitkat and m&m cake.

It really couldn't get much easier than this for a good-looking cake.
Step 1. Bake 2 8"round cakes. You can do this with just one box of cake mix. 

Step 2. Frost the cake between the layers and all over the top and sides.
The beauty here is that you don't need to make it pretty because the whole thing
(yup, the whole thing) will be covered so no one will see your frosting skills. 

3. Unwrap the kitkats. Try not to eat them - and I'll tell you why.
It's not because I don't want you to have them, it's because you will
need the whole bag to surround the cake. Stand the kitkats up around the sides
of the cake, pressing them in slightly. 

4. Open the large bag of m&ms. You can eat some of these because you will only
 need about half the bag to cover the top of the cake. Pour and kind of pat them
 down into a single layer. 

5. I thought the bow in the original picture on Paige's blog was kind of overkill
but once I was done, I realized mine needed a bow too, if just to keep those kitkats in line.
Wrap, tie the bow and store in the (basement) fridge until cake time. I don't really
know if you need to keep it in the fridge, but in my house, it's always better and safer to
be out of sight, out of mind. 
 
Sing Happy Birthday and enjoy!

And then when everyone leaves, have yourself a handful of m&ms when no
one is looking because there's gonna be a whole lotta dishes in the sink waiting
for you.
 
 
My now two-year old loves loves love balloons. So we made balloon cupcakes for the little party we are making tomorrow.
These could not be easier even if I tried to make them easier. Don't believe me? Watch. 
1. Bake cupcakes. 
2. Frost. 
3. Stick lollypops into the cupcakes.

And you're done.
Listen as the kids squeal in delight, not so much because they appreciate the aesthetics of a cupcake, but more because they get to have a cupcake and a lolly at the same time.
To each his own. 
 
 
We're about to go slightly overboard with a little girl's second birthday tomorrow. 

The first installment of party fun are these cupcakes. She really wanted Curious George but we were working with what we had in the house, so Cookie Monster it is.
Does he look like Cookie Monster? I kind of thought yes but with maybe something slightly
off that I couldn't put my finger on. So far though, between my husband and my brother
and my oldest, I have been getting comments like:
"I think he looks more like Grover."
"Isn't Cookie Monster's head more football shaped?"
"I think his eyes are weird, no?"
"Why does he have only a few pieces of cookie in his mouth?"
And my personal favorite:
"Who's that?"

 Whatever. Here's the how to:
1. Bake a batch of whatever cupcake your birthday kiddie likes. 

2. Frost. And when I say frost, I mean that you should open a can of Duncan Hines vanilla
frosting, tint it blue (the brightest blue you can find, preferably using gel colors and not
liquid based colors. Also be sure to wear gloves when using gel colors, they make a huge
and hard to wash off mess) and frost your cupcakes. 

3. Attach the eyes. There are probably many different ways you can go with the eyes - for example, mini marshmallows or white candy melts for the eyes, along with some melted dark
chocolate or an appropriately colored M&M. I went with what I had in the house - white Mentos candies and chocolate chips. I attached the chocolate chips to the Mentos with a drop of frosting. I realize that Mentos are not exactly a child-friendly candy so I will just remove them before the kids start to eat.

4. Make a mouth. Again, several ways you can go here. You can bake your own small chocolate chip cookies to stuff into Cookie's mouth or you can just buy a bag of cookies. I actually
find baking the cookies easier than going to buy the cookies with the kids but to each her own, ya know? I found that the whole cookies were too big to use, so I tried breaking them in half. Those looked okay, but then I saw these cookies and thought these were way funnier. So I crumbled
up a cookie to make it look like Cookie Monster was eating his cookie right now. 
 
Remember to make appropriate Cookie Monster noises when you eat these - om nom nom!
 
 
We bought a bunch of Lack tables from Ikea a while back and this yellow one used to live in my living room. Somehow, it wound up in the basement, possibly when people started using it as a landing pad on the way from using one trampoline (couch) to the other trampoline (couch). And once down there, it was just a hop, skip and a jump to being used as the table that held all the painting supplies when we did the basement a few weeks ago. So now my pretty yellow table is all splattered with paint and I can't get it off.
I've been looking at this messy little table every time we go downstairs to play. I didn't to get rid of it, it's such a cute little table. And then the kids started using it as a pretend playing house table - setting it with plates, forks, cups and stuff. And because I have trouble leaving well enough alone, I thought it would be fun to make it into a real tea party table - and some scrapbook paper and some Mod Podge later, we were in business.

I didn't take pictures of each step because I had a little two-year-old helper who was enjoying waving the gluey paintbrush around just a little too much. Instead, I'll just tell you - I cut out rectangles for the placemats, circles for the plates - although I guess they are more like chargers than plates. I also cut out circles as saucers for teacups and triangles as napkins. That's it. Glue the pieces on, wait for them to dry and then add another coat of glue on top to harden it all up. The back of my new bottle of Mod Podge says to let the project cure for four weeks, but that's not going to happen.
I'm hoping when the kids come home, one or more of them will set the table so I can take a picture and share.

Total project cost: Free. I had everything in the house.
But even if you don't, it's still pretty darn cheap.
Lack table: $7
Bottle of Mod Podge: $5
Four sheets of scrapbook paper: $1
So fun.
Tip Junkie handmade projects
 
 
I can't say for sure, but these grilled cheese sandwiches might be the reason Josh married me.

My grandmother, Bobby Toby, used to make these awesome grilled cheese sandwiches in a frying pan, and while I make them with whole wheat bread and a heart healthy butter, she made them with white bread, real salted butter and way more American cheese than I even allow into my house. My way is very good and not bad for you. Her way was excellent, but very very not good for you.

One day, before we were engaged, Bobby Toby whipped up a rather large batch of these and from then on, Josh looked at me a little differently. And this coming from a guy who had such a limited eating palate when we got married that I was scared I would never again see a salad that contained a lettuce that was not iceberg.

We make them in our house at least once a week for dinner, and sometimes for breakfast on a Sunday too. For a family of six, like mine, you will need at least an entire loaf of bread, if not more. You will also need a stack of American cheese - we just buy the huge packs of 108 slices, which I have to say, I did not know existed before I met Josh. I also did not know that yellow American cheese existed before I met him but there are a lot of gross things I did not know about before I got married so what's one more, right?

Here, in just a few easy steps, is how to make the best grilled cheese ever - and you won't need a panini press. Just a frying pan and a spatula.
1. Make a stack of bread slices and count them to make sure there are an even number.
2. Using a heart healthy butter, butter one side of each slice and stack em up. It's okay if some butter gets on the unbuttered sides.
3. Heat your frying pan; no need for any non-stick spray because the bread is already buttered.
4. Once hot, place the bread, buttered side down in the pan.
5. Add cheese.
6. Add another slice of bread on top, buttered side up.
7. When the bottom bread gets brown and crunchy, flip.
8. Wait until the other side has also gotten brown and crunchy and move to a plate to cool.
9. Wash. Rinse. Repeat.
10. Stack up your grilled cheese sandwiches and call everyone for dinner.
I guess if you really wanted to, you might add tomato slices to the sandwich before you add the second piece of bread, but really, why play with perfection?
 
 
So just so we're all clear, this is what happens when we are derelict in our backyard duties and do not empty or cover the (very full) sandbox at the end of the summer.
Mix together some rain, a little snow, some random toys, below freezing weather and of course, the 20 pounds of sand that live in the sanbox and there you go, a frozen sandbox.
Gross. And tons of fun to clean come spring :)