I am continually amazed/astounded/horrified by how much paper my kids bring home from school. Mulitply their load by 16 kids per class. Multiply that by a good 150 days of school a year and that, my friends, is a big number. Not sure what it is, but I do know that that's a forest right there. I can pretend to be outraged by all the waste and non-recycling and greenhouse global warming whatevers, but I won't. My main concern here is my kitchen - and all the clutter these papers make on my counters.
My kitchen essentially has three counters, although if I am being totally honest, two of the counters are joined together in a U-shape -and the part that juts out into the center of the room is called The Peninsula. At least, that's what we call it. It can also be called a breakfast bar or just as easily, the-stupidly-placed-counter-that-takes-up-tons-of-floor-space. Whichever you prefer. There is also another small counter, which we call The Small Counter, where these papers tend to congregate when The Peninsula is full.
My kitchen essentially has three counters, although if I am being totally honest, two of the counters are joined together in a U-shape -and the part that juts out into the center of the room is called The Peninsula. At least, that's what we call it. It can also be called a breakfast bar or just as easily, the-stupidly-placed-counter-that-takes-up-tons-of-floor-space. Whichever you prefer. There is also another small counter, which we call The Small Counter, where these papers tend to congregate when The Peninsula is full.
To remedy the problem of the pile two years ago, I just threw everything out that didn't have my kid's handprint on it. He was three and generally didn't even realize he had brought home any projects in his backpack.
Last year my paperload doubled as two kids went to school. So last year I bought each kid a super-large binder from Staples, decorated the cover with their names and grade and proceeded to punch holes in everything they brought home and stored them in these binders. Lovely, really a lovely idea, memories and all that. That lasted for about two months. Then I kinda just started sticking stacks of papers into the binders without punching holes and now, many months into a new school year, those last-year binders are in Shoprite bags in the attic, with the papers from December through June just stuffed into the bags, no holes, no order, nothing.
This year, I was not looking to add to my collection of things shoved into Shoprite bags in the attic, so I needed to find a different tactic. This year, as they bring home their mounds of stuff each Friday, we all look at everything together. We ooh. Then we ahh. Then we decide what we must absolutely keep because we worked so hard on it and it's so beautiful, mommy. Then we count how many of these stunning papers there are between the two boys, because our maximum weekly paper allowance is eight, in total, between the two kids.
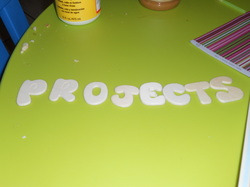
Why eight? Excellent question. Eight, because if you count the letters in PROJECTS, there are eight letters. Go on, count. It's okay if you don't believe me right away. Okay, now that we are all on the same page, I will explain further - we made a hanging display where the kids can showcase their artwork. We strung a string (say that ten times fast) across one of the windows in the living room and we decorated clothespins so we can attach their projects to the string. And there you go, a rotating exhibit of their best work. And after a week, if anyone brings home anything they feel is worthy of hanging up, they can exchange it with one of their lovely submissions from the previous week. Everything else goes in the garbage. Cruel? Maybe. Heartless? Probably. But dangit, I can see my counters, and that's what counts.
To construct your own lovely clothespin hanging thing, here is what we did.
1. Cut a piece of string a little longer than the width of your window. Tie the string to either end of your curtain rod. If you don't have a curtain rod, you can hang the "eye" part from a hook and eye lock on either side of your window molding and tie the string to those.
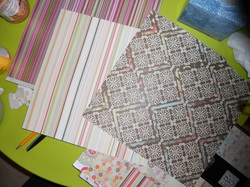
2. Gather eight clothespins, some scrapbook paper and modge podge. Measure and trace the clothespins. You can just measure and trace one and use that template for all of them. I can say that so nonchalantly because I learned my tracing lesson the hard way.
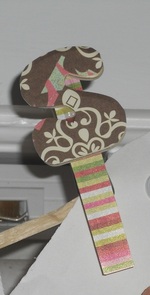
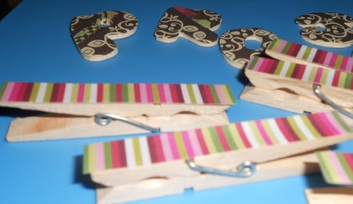
3. Modge and podge those clothespins. Let them dry.
4. Do the same thing to your tiny wood letters that you just happen to have around the house. We spelled out PROJECTS but you can spell anything, like STUFF or LOOK AT ME or even YOUR KID'S NAME. Again, trace the letters (in this case, unlike in the clothespin case, you should probably trace each letter on its own).
5. Hot glue the letters to the clothespins. Let them dry.
6. Hang them up and wait for your kids to come home and notice their awesome new Art Project Central. Keep waiting cause it's been an hour since they came home and not one of them noticed the string hanging across the window. Point it out to them and watch as their little glazed eyes move slowly from the TV to the window and back to the TV, not quite acknowledging your presence.
7. Hang up some of their projects. Once the projects are up, they'll love it. And if they don't, whatever, cause again, the goal here was a clear counter and mine are clear(ish).
1. Cut a piece of string a little longer than the width of your window. Tie the string to either end of your curtain rod. If you don't have a curtain rod, you can hang the "eye" part from a hook and eye lock on either side of your window molding and tie the string to those.
2. Gather eight clothespins, some scrapbook paper and modge podge. Measure and trace the clothespins. You can just measure and trace one and use that template for all of them. I can say that so nonchalantly because I learned my tracing lesson the hard way.
3. Modge and podge those clothespins. Let them dry.
4. Do the same thing to your tiny wood letters that you just happen to have around the house. We spelled out PROJECTS but you can spell anything, like STUFF or LOOK AT ME or even YOUR KID'S NAME. Again, trace the letters (in this case, unlike in the clothespin case, you should probably trace each letter on its own).
5. Hot glue the letters to the clothespins. Let them dry.
6. Hang them up and wait for your kids to come home and notice their awesome new Art Project Central. Keep waiting cause it's been an hour since they came home and not one of them noticed the string hanging across the window. Point it out to them and watch as their little glazed eyes move slowly from the TV to the window and back to the TV, not quite acknowledging your presence.
7. Hang up some of their projects. Once the projects are up, they'll love it. And if they don't, whatever, cause again, the goal here was a clear counter and mine are clear(ish).
