the Crumb Factory
  • Home
  • Blog
  • About Us
  • My Articles
  • My Crumb Cakes

Pizza Dippers

1/27/2011

1 Comment

 
Do you know what you're having for dinner tonight? I do - I mean, I know what you're having, or what you should be having, that is. We had this last night - and it was easy, fast, yummy and once the kids got the hang of it, they were able to do it mostly by themselves - at least the older ones. So make it tonight. No, really, make it.

And, AND, I had all the ingredients in the house, which is saying alot considering that we are on day seven of a winter break that has thus far, seen three snowstorms. That means ALOT of time in the house, cooking something like seven or eight meals a day.

To start, make one batch of your favorite pizza dough recipe or just use frozen pizza dough, about two pounds worth. And for what it is worth, Trader Joe's sells excellent frozen pizza dough for 99cents a pound. I'm just sayin. If Trader Joe's wasn't so far away, my pizza dough recipe would never see the light of day.  

Then I kind of followed the directions I found
here.
Picture
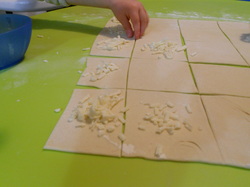
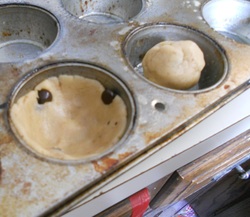
Roll out half the dough into something resembling a rectangle and using a pizza cutter, cut lines to make a bunch of squares. Mine were not all the same size, were probably not even really squares and really, it made no difference whatsoever. Sprinkle some cheese onto each square and sit back and watch as the kids try to roll the squares up around the cheese, attempting to make cheese-filled dough balls. They don't have to be perfect - remember, this is dinner and an activity rolled up into one, well, cheese-filled dough ball. This all took a good 30 minutes, totally enough time to call this a successful-time-waster-that-is-not-TV.

Picture
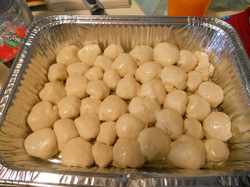
Have the kids place each ball into a greased pan, preferably disposable so there will be no cleanup. Brush some olive oil on top, sprinkle some garlic powder and/or onion powder, salt, whatever you have. If you have any leftover cheese, sprinkle some on top too.
Picture
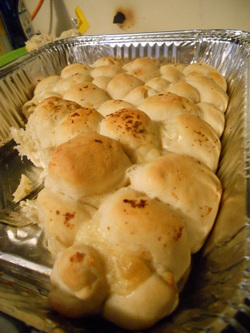
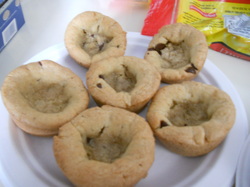
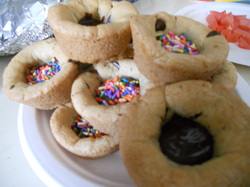
Bake in a preheated 400 degree oven for 20 minutes and you will be rewarded with a delicious and fun(!) pull apart pizza, without sauce. Without sauce? Not entirely. Each kid got a dixie cup filled with pizza sauce to dip his or her dinner into. And while I wish I could say fun was had by all, it was not, in fact, had by all.

My conversation with my little contrarian went something like this:
Him: Where's the pizza?
Me: Right here. This is the pizza. You just helped make it.
Him:
No. This isn't pizza. I want pizza.
Me:
It is. There's sauce and cheese and dough.
Him:
No. No. No. NO. THIS IS NOT PIZZAAA!
Me:
Do you want cereal and milk?
Him: Fiiine.  

And now, if you are a mother to small children you will automatically know what happened next.

Every other child at the table, including our extra-long-and-yet-very-well-behaved-playdate-friend who up until now had been very happily dunking his dough into his cup of pizza sauce, demands cereal and milk.  

Cereal and milk for everyone!  

Except for my good natured Josh, who is very happily making his way around the table eating all the untouched pizza pull aparts.  

You know what they say, a kid has to see a new food fifteen times before accepting it. It just never occured to me that pizza, in any form, would ever qualify as a new food in my house.
1 Comment

Salad Spin Art

1/26/2011

0 Comments

 
About a year ago, while visiting our good friends in Westchester, my kids got to play with a Spin Art Machine - and have been coveting one ever since. I kind of felt bad this whole time, but I kept forgetting they'd wanted one. If I would have seen one in a store I'm sure I would have picked one up, but since Shoprite does not sell Spin Art Machines, being in a store that sells these babies was highly unlikely.  

And then today, on Yet Another Snow Day, I vaguely remembered that my sister-in-law had once used her salad spinner as a spin art machine at my niece's carnival themed birthday party. My memory of how it actually worked was a little hazy - it was years ago, I was pregnant, and the salad spinner was not anwhere near the food table. I called my sister-in-law and got her answering machine, so I figured we'd just go for it. And we did. And we had so much fun.   

First we traced the bottom of the salad spinner onto paper and cut out a gazillion circles so we could make a gazillion spun paintings.
That was the hard part.
 
Picture
Picture
Then we just put the paper in, took turns squeezing the (washable) paint and turning the salad spinner handle, and yahoo, spin art. Tons and tons of spin art. 

Picture
Then we played twister.
Picture
And it's supposed to snow another 8-12 inches tonight. 
Good times. Good times.
  
0 Comments

Chocolate Chip Cookie Muffins

1/25/2011

2 Comments

 
Another. Snow. Day.
Yup, more snow is coming and this is bordering on the ridiculous. If it wasn't such a pain, it would be funny. Every time we (Josh) shovel, it snows again. Maybe we should just stop shoveling. So when it snowed A.G.A.I.N. last week, we made these in the kitchen. We called them Chocolate Chip Cookie Muffins. So much fun. But I can't take the credit for the great idea - I saw them here first. We did, however, make them our own by adding sprinkles and whole, unmelted chocolate chips to all the melty stuff - well, you'll see.
Picture
Picture
First things first, mix a batch of your favorite chocolate chip cookie recipe. Logic would dictate that one make a margarine or butter-based recipe because the point here is for the cookies to not spread that much, but having no margarine, we made an oil-based recipe and it worked out totally fine, so for trans-fat sake, go with the oil.  

I will now tell you how to make these very yummy treats, but in return, I need to know that you will not judge me on the state of my muffin tins. I scrub and I scrub and I scrub some more and I just cant get them any better than this. I show them to you in good faith. I could have said they were family heirlooms, invoking my beloved grandmother's name, but I didn't. So judge me not.  

Anyway, spray a muffin tin with cooking spray and make 12 largish walnut sized balls. Place the cookie dough balls into the muffin tin, one ball per cup. One ball per cup. That sounds kinda like something I shouldn't be typing but I can't for sure figure out why. Anyway, flatten out each cookie dough ball and push the dough into the bottom and up the sides of the muffin pan. Bake for as long as you would a sheet of cookies - using your recipe as a guide. 

Picture
My cookie dough cups came out of the oven all puffed up but after they cooled off, the centers fell back down and I was left with actual cups made of chocolate chip cookies. That, in itself, was enough to send the kids into fits of joy, but wait! There's more!  

We melted a 1 cup of chocolate chips and 1 tablespoon of trans-fat-filled shortening (so sue me!). Spoon a tablespoon, maybe a little less, of the melted chocolate into each cup - adding 3 or 4 chocolate chips to the top and covering the whole chocolate shindig with sprinkles. Well, maybe not all of them, especially if you have, like I do, a little girl frightened of sprinkles.
 

We baked the rest of the cookie dough as regular chocolate chip cookies just in case these came out weird. Turns out, it wasn't necessary.
Picture
Let everything cool, settle, harden, whatever. Serve and eat. These were, quite possibly, the best thing to come out of our kitchen in a while. Every single person at the table liked them - two families, 11 people, and the Chocolate Chip Cookie Muffins were gone. Not sure who sneaked that last one for his/herself, but whoever it was, good for you!  

2 Comments

A Half-Birthday Party

1/22/2011

0 Comments

 
We celebrated a half-birthday on Friday. My two-year-old baby is now two and a half. Craazy. And so we made a small party. We made birthday crowns, we made bracelets and we decorated birthday cupcakes. We, however, did not do the one thing that I had planned. And if you have been following along you will know what I am talking about. And if you haven't been following along, hurry up! I'll wait while you catch up.

So yes, we forgot to write in the half-birthday book. I put it away so no one would touch it and then, of course, forgot all about it. Sigh.

I guess we can write in it tomorrow. No one will remember that we were off by a few days.  

But here's what we did remember to do:
Picture
Picture
We made these crowns based on a tutorial that I saw here. Each kid chose their colored paper - and I think that might have been the hardest part, because these crowns are so super-easy to make. Staple two pieces of paper together to make one extra long piece of colored paper. Cut slits along the top of the length of the paper, every inch or so. The slits should go halfway down the paper. It will look like the paper has a bunch of fringes along one long side. Roll each fringe up (or down, depending on how you are holding the paper.) Don't worry, you can't mess this up because there is only one direction in which the the paper can be rolled. Measure the crown around each little head and close it up, either with staples (away from fingers) or tape (not so away from fingers). And surprisingly, these crowns are not as flimsy as they look because the kids have been wearing them for two days straight and they are still all in one piece.
 
We also made a mini crown for the baby, so she wouldn't feel left out.

Picture
Then we made these Fruit Loop bracelets:
Picture
Very simple. Very effective time-waster. And you can eat them when you're done. A win-win for everyone. We did have an issue that is common to jewelry made from circular foods. The knot that gets tied at the beginning of the string is never quite big enough - cereal always seems to fall off the end. So this time, in a stroke of genius, if I may say so myself, I tied the knot around a fruit loop, that way the fruit loop acted as the knot. Clever. I know. 

And finally, we made these.
Picture
Picture
The recipe for the cupcakes is the same one we used for the delicious chocolate pudding cupcakes last week. But this time, we frosted them. Some had sprinkles, some didn't. Some people in this house loooove sprinkles and some are just plain scared of them - the half-birthday girl being one of them. We're hoping she grows out of it.
0 Comments

The Fruit Dehydrator

1/20/2011

1 Comment

 
So I don't recall exactly how we came to be in possession of a food dehydrator, but we have one. I do know it involved some combination of infomercials, Josh's love of beef jerky and my mother in law's credit card, but beyond that, the details are a little fuzzy. How to actually use the dehydrator was a little fuzzy too as we haven't taken it out of the box since we lived in Phoenix over seven years ago and thought it would be a good idea to make beef jerky as part of our desert themed mishloach manot. (And if you were one of the lucky recipients of those star-crossed jerky filled boxes that were shipped across the country with love from Arizona to NY, you will surely remember them fondly...)  

And then last night, when I was packing lunchboxes, it occurred to me that it might be kind of fun to make dried fruit for Tu B'Shvat. And, and, it would be a great way to use up all the kind of oldish fruit sitting in the fruit bowl.
Picture
Picture
So I peeled, sliced, and marinated the fruit for a minute or so in orange juice. The directions said to use an acidic solution. I didn't have any solution that was labeled acidic but I figured orange juice was pretty acidic, so it would have to do.

My girls and I loaded up the machine and after a few false starts, figured out how the machine fit together. Hit the on button and left the kitchen and the dehydrator to its own devices.
Picture
Picture
And six hours later, six hours filled with the soothing sounds of what sounded like a white noise machine (made me want to take a nap. Not so much for the girls...), our dried apples and pears were ready.  

(Here is a really terrible picture of my apple chips.
Not sure why the camera seems to angry at me lately.)
Picture
I tasted one, thought they were pretty good - and by the time the fruit was finished dehydrating, the boys were home too - and I offered some to the kids. I marketed them as apple chips, like potato chips but sweet, guys!  My oldest was the only one brave enough to take a bite. And this is what he said, as the chewed up apple chip fell out of his mouth and onto the kitchen floor: "Uch, Mommmmy! Did you leave them in too long?" The rest of the kids ran in the opposite direction.  Lovely.  

On the plus side though, Josh loved them.
Happy Tu B'Shvat!
1 Comment

The Half-Birthday Book

1/19/2011

1 Comment

 
Much like kids everywhere, mine love love love their birthdays - and in our house, we always try to make a huge deal out of birthdays. Each kid usually winds up with several parties - a family party with grandparents, uncles, aunts and cousins on the Sunday near their birthday, a party in school weeks and weeks before their birthdays (we have summer birthdays) and a birthday cake made by his of her siblings, on the morning of their birthday, with everyone still in pajamas.   

Here are some of the cakes I've made for those big summer-family-parties.
Picture
Picture
Picture
And here you can see my first blog post, also birthday related.  

Do I go overboard? Do I do this for me? For them? What's my motivation here - besides for having an excuse to eat a big piece of chocolate cake? I believe the hope is that these are the memories that my kids will take with them as they grow older, for when they want to spend more time out of the house than in the house and for when they stop thinking that mommy-made birthday hats and cakes are cool.  

So if most of the kids' birthdays are in the summer, why am I introducing this now? I'll tell you - we are entering the season of half birthdays. And we like half-birthdays. Half birthdays are like the cream inside a cupcake. You can't really tell if a cupcake has a cream filling until you bite in, and if there is, then hey! What a fun surprise! Half birthdays are like the cream, an unexpected surprise. My kids never know when their half-birthday is coming, so it always, hey! What a fun surprise!  

Half birthdays are laid-back. No real party, no big presents - and no mommy-time spent trying to find that big present. Half birthdays consist of cupcakes, a balloon and a hug and a kiss. And this year, we are introducing a new element to half birthdays. The Half-Birthday Book.
Picture
The Half-Birthday Book is really just an extra marble notebook that I found on the shelf in the porch. And then I decorated it, using paper, mod podge, scissors, and a pencil. And it was all done between the opening credits of last night's The Good Wife and the second commercial break. Pretty quick.
Picture
A How To: 
Step 1:
Turn the notebook sideways - my plan is for anyone who writes in the book to do sideways. That's just my preference.
Step 2: Trace the cover of the notebook onto a paper and cut it out so you have template of the notebook's cover.
Step 3: Use the template to cut a piece of pretty paper to fit the notebook's cover. Mod Podge it on. Let dry
.

Picture
Step 4: Use the rest of your papers to decorate - I printed out the words "Happy 1/2 Birthday" on the computer and glued it on top of some other paper, to create layers. I would have preferred to use a paper-cutting machine such as a Cricut or Sizzix, but sadly, I do not own one. But they do make lovely gifts. Just saying.
Step 5: Keep decorating or stop if you're done. I drew a cupcake and then cut it out of various colored papers and glued it on. Anything goes. You can just glue a picture of the family on the notebook and be done.

Picture
Picture
And now for the essay portion of the test:  
Was is the purpose of the notebook?  

The purpose of the notebook is to engender nice feelings between siblings. And I guess parents too. Each family member will draw a happy birthday picture or, for those of us who have learned how to write, a note,  either on a paper that will get glued into the notebook or in the notebook itself for the half birthday boy or girl. And since all the pages will be in the notebook, the kids will be able to look back on it for years to come and see the funny/sweet/silly/scribbled black rectangles that were made for them on their annual half-year mark.  

And now onwards to figuring out what to do when the baby turns one(!) in February. We never had a winter birthday before...
1 Comment
<<Previous
    Are you a Mom?
    Of course you are,
    your shirt is dirty :)
    Read this

    Archives

    September 2018
    August 2018
    July 2018
    June 2018
    May 2018
    April 2018
    March 2018
    February 2018
    January 2018
    December 2017
    October 2017
    September 2017
    August 2017
    July 2017
    June 2017
    May 2017
    April 2017
    March 2017
    February 2017
    December 2016
    November 2016
    October 2016
    September 2016
    August 2016
    July 2016
    June 2016
    May 2016
    January 2016
    December 2015
    June 2015
    March 2015
    February 2015
    October 2014
    September 2014
    August 2014
    July 2014
    June 2014
    May 2014
    April 2014
    March 2014
    February 2014
    January 2014
    December 2013
    November 2013
    October 2013
    September 2013
    August 2013
    July 2013
    June 2013
    May 2013
    April 2013
    March 2013
    February 2013
    January 2013
    December 2012
    November 2012
    October 2012
    September 2012
    August 2012
    July 2012
    June 2012
    May 2012
    April 2012
    March 2012
    February 2012
    January 2012
    December 2011
    November 2011
    October 2011
    September 2011
    August 2011
    July 2011
    June 2011
    May 2011
    April 2011
    March 2011
    February 2011
    January 2011
    December 2010
    November 2010
    October 2010

Powered by Create your own unique website with customizable templates.