the Crumb Factory
  • Home
  • About Us
  • My Crumb Cakes
  • I write too!

A Muffin Redo

3/30/2011

1 Comment


It's been a while, my friends.

When you combine all the little things in life, like the fact that my Verizon connection has been so slow the past few weeks - no really, so slow that I could have blogged and then mailed it to you with a stamp and envelope and everything - plus two kids with pink eye, three with bad colds, plus trying to learn where everything is on this new computer we are using, well, that's kind of what you get - the "It's been a while" line.  

But we're back - Verizon has been spoken to, eyes drops are being administered and the rate of tissue consumption has been somewhat down this morning, so I thought it might be safe to approach the computer. We'll see how long this lasts, but I'm not crossing my fingers.  

I am, however, feeling a little guilty about missing a Cookie Tuesday. I don't have a new cookie recipe to share today, and I do realize that's it not really Tuesday anymore, but in the spirit of friendship and in grateful thanks to the special people* who take the time to read my blog even though we've never actually met and who took the time to shoot me an email and see if everything was okay when they didn't get any TheCrumbFactory updates, I do have a reworked muffin recipe.  

So this week will we have Muffin Wednesday. And I'm sad to say, it's not even a new recipe, it's one I have shared before, here. But when I was making them this week, I realized that I was out of applesauce.

If I had known that I was out of applesauce, I wouldn't have attempted to make the muffins. Unfortunately, I was halfway through mixing before I realized and once many of the ingredients were mixed, I couldn't just throw it all out. So instead, after panicking for half a minute and looking through a very empty fridge, I used an equal amount of yogurt - chocolate yogurt, The Stonyfield Farms organic chocolate yogurt, which while fantastic on it's own, made these muffins totally awesome. The muffins, you see, are still fiber-filed and yummy but now they are just so much better** because they are chocolate too. 

 So this week will we have
Muffin Wednesday...

So here is the new revamped Pancake Muffin Recipe:
1 and 1/2 cups whole wheat pancake mix
1 cup uncooked oatmeal
1/2 cup brown sugar
1 cup soymilk or rice milk
1 egg
1/4 cup oil 
4 ounces of Stonyfield Organic Chocolate Yogurt  

Mix all. Spoon into greased muffin tins and bake at 425 for 13 minutes. No pictures, sorry. We looked for the camera last night, but it seems it's been misplaced in a haze of dirty tissues. The search will resume after bedtime tonight. 

*Yes, my real friends and family are special too. And some of you even read my blog. But just so you know, you didn't call to see why no updates were forthcoming. I'm just saying. But I love you anyway.

**I would like to take a second and just say thank you to the people who wrote in and said they really liked the original version of these muffins, straight from the oven, but that by the next day they weren't as good. I agree. That's why I started keeping them in the freezer and then sticking a couple in the microwave for 40 seconds right before the girls eat them for snack in the morning. They are so much better this way, and every single person in my house likes them. And that never happens.    
1 Comment

Cookie Tuesday: Sugar-Free Peanut Butter Cookies

3/22/2011

2 Comments

 
Picture
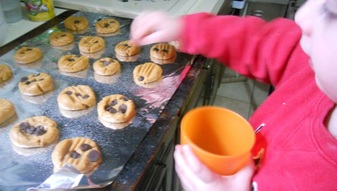
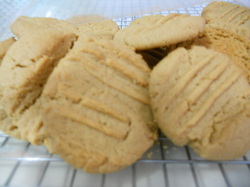
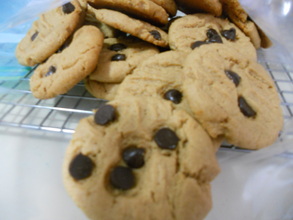
I have made these cookie for my father, who has diabetes, many times in the past and they have always been a hit. The original recipe comes from Martha Stewart's Everyday Food TV show, but I replaced the sugar with Splenda and the cookies are still surprisingly very tasty. I have not always had much success with sugar substitutes, but these work very well. Sometimes we add sugar-free chocolate chips to the batter and sometimes we leave them as plain cookies.  

This is what I do:
1 cup creamy or crunchy peanut butter
3/4 cup Splenda
1 egg
1/2 teaspoon baking soda
1/4 teaspoon salt
1/2 cup sugar free chocolate chips (optional)
  

"...perfect for all those late night sugar-free dessert cocktail parties that you throw. Yeah, me too."

The batter itself is pretty thick and dry - and sticky at the same time. Strange, I know. The best way to make these cookies is to mix all the ingredients except the chocolate chips. Then stir in the chocolate chips by hand or just let the kids stick individual chocolate chips into the cookies (an activity!).

Grease a cookie sheet with cooking spray and using dry hands, form the batter into small balls and place them on the cookie sheet. These cookies don't spread, so you can place them pretty close together. I can usually get all the cookies from one batch onto one cookie sheet, getting between 16 and 20 cookies, depending on how big they are. Once all the balls are formed, use a fork to flatten the cookies slightly. Bake at 350 for about 12 minutes or until the edges are starting to brown. I always try and double the recipe and freeze half so I have some to give to my dad that day and then some the next time he comes.  
Picture
Once, when I was a in rush, I forgot (neglected) to flatten the cookies and they baked in the shape of balls. And they were fine, so the truth is, if you are looking for a peanut-butter-chocolate-chip-cookie-ball, this is your recipe too! It's like two recipes in one. And now that I think about it, if you bake them as cookie balls, they can be dipped into melted chocolate after they are baked and served on toothpicks - you know, for all those late night sugar-free dessert cocktail parties that you throw. Yeah, me too.
Picture
2 Comments

Playdough Cookie Pops

3/18/2011

0 Comments

 
Picture
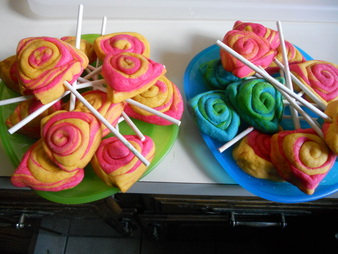
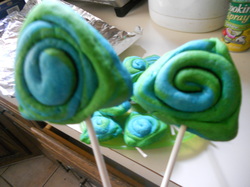
These are the cookie pops we spoke of yesterday - the ones that made it into the army of brown paper bags. These cookies, baked on lollipop sticks, are the brainchild of Amanda, from Amanda's Cookin, a blog that I have extolled as extremely virtuous in the past.  

Amanda made these in many different shapes, including the obvious round cookie-pops, plus heart shaped ones, rainbow shaped ones and a whole slew of shamrock themed ones. We made hamentasch shaped ones  - that is to say, we made triangle shaped ones.  
Picture
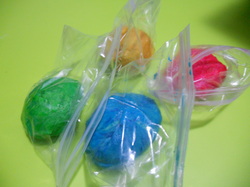
The recipe and really very easy and detailed instructions can be found here. Like Amanda, I used gel colors from Wilton to color my dough. Whenever I use these colors to make colored fondant for a cake, my hands always become stained - even when I wash my hands right away. Just keep in mind that this might not be the project for you if you are, how shall I say this, planning any ritual bathing in the next day or two. If you have no idea what I am talking about, then just keep on moving to the next paragraph. If you do understand me, then just know that there is another way to color the dough. Pop the piece of uncolored dough into a sandwich bag, drop some color into the bag, seal it up without any trapped air inside and kind of smoosh the dough around with the color. It might not be perfect, but at least your hands will be clean, and more important than clean, unstained.  

To make the hamentasch shaped cookie-pops, I followed the directions for the round cookie pops. Once I had all my round cookies made, I inserted a lollipop stick into each one and then just sort of patted the dough into a triangle. I had toyed with the idea of putting sprinkles in the center to act as the hamentaschen's filling, but I didn't. I'm pretty sure it was because the baby woke up.
Picture
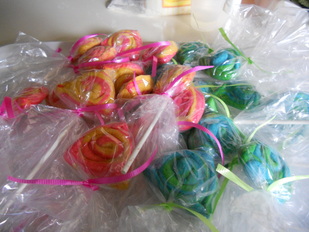
Once the cookies were shaped and baked and cooled, we wrapped them. I had considered buying those very nice lollipop bags from AC Moore, but then I didn't. Not cause the baby woke up, but because I realized I could just use plastic sandwich bags - the kind that don't have a seal on top, the kind that just fold over - because those come 200 in a box of 1.99 as opposed to the fancy lolly bags that come 30 in a box for $6.99. Slight price difference there.  

I wrapped each cookie in a bag, placing the top tip of each triangle cookie in a corner of the bag and wrapping the bag behind the cookie so the seal was tight. Then I just tied ribbon around the top of the lolly stick and presto, fancy lollypop cookies. My kids were in awe, and the cookies even tasted good, something that doesn't always happen when we try fancy. But the kiddies were happy and sometimes it's nice to make your kid's day with a cookie.

This is a super fun project to do with the kids and I would for sure make these again when the kids are home. They can even do most of it themselves, once they get the hang of rolling the dough. A excellent fine motor skill activity, if you will. And what could be better than a fine motor skill project that ends in snacktime? Nothing. That's what.
Picture
0 Comments

The Paper Bag Army

3/17/2011

0 Comments

 
Picture
Getting ready for Purim is a huge deal. You have to figure out what costume each kid will wear, keeping in mind that they will change their minds seventy-three times before Purim day actually comes. Then there is the who, what and when of the Purim seuda (meal), and of course, the mishloach manot packages that are lovingly delivered in a frenzy of buckling and unbuckling four kids in the van seventy-three times over the course of not more than two hours (we hope).  

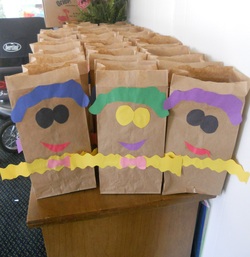
This year my boys wanted to make their own little mishloach manot bags for their friends. Adorable, you say. Oh, they're growing up so fast. And you're right. It is and they are. In an effort to keep costs down this year and still make bags for all the kids in their classes (and this totals 32 kids, by the way), we have opted to go the way of the brown paper bag.  

I find paper bags, especially the small lunch sized ones, to be fascinating. There are just so many uses for these bags, besides for the obvious use of just holding things. Paper bags make great puppets, they make cute little crowns when cut and colored properly, they help your bananas ripen faster, the kids can make wrapping paper out of them, and my personal favorite, learned from my eighth grade science teacher, Mrs. Pincus, paper bags can and should be used as book covers. She even taught us how to do it. She was a creative one, that Mrs. Pincus. And an interesting one too. One afternoon, she walked into her science class and proceeded to unbutton her blouse (while dancing, I might add) to reveal a flesh-colored t-shirt underneath, adorned (silk-screened?) with a photo of the inside of a human chest - heart, lungs, intestines, the whole deal. Fun times, that eighth grade science class.  
Picture
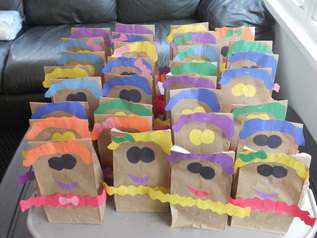
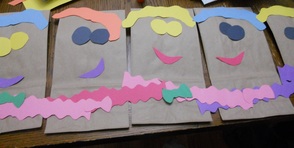
Anyhow, so we have decided to take the brown bag route this year. The boys decided that they wanted to decorate the bags, so we got out the colored paper, scissors and glue. I cut out different pieces, like eyes, smiles, hair, bowties, and those ruffle collar things that clowns wear. It was the perfect rainy-Sunday-morning activity, until the kids decided that they were done and there were still about twenty naked paper bags. Don't get me wrong, it was still the perfect rainy-Sunday-morning activity, except now it was the perfect rainy-Sunday-morning activity for me. But once I got myself into a groove, I was able to glue the pieces onto five bags at a time by lining them up and going down the row with the glue stick and the little papers, and I was done in no time.
Picture
And now, two days before Purim, these little bags have been packed* and closed up and are sitting on the picnic table in the porch, looking like a little paper bag army. These little guys are seriously cute and my boys, also seriously cute, are so super excited to deliver their mishloach manot to all their preschool buddies. Now I just have to finish up the rest of the mishloach manot and we'll be good to go. Purim, here we come.   

*So what to put into the goodie bags for the kids' friends? Whatever's on sale, that's what. So we packed juice boxes (10 for $2), mini fruit by the foots (feet?) (2 boxes for $4, and a 50cent coupon that was doubled!), chocolate bars (8 for a buck), and the most fun, playdough lollipop cookies. We made them. And they look like playdough. But I can't say more because then I will have nothing to report tomorrow. Oh, and fellow preschool mommies, if your kid is getting one of these bags, please don't show him this, my boys really want their bags to be a surprise.
0 Comments

Cookie Tuesday, Thursday, Whatever: Double Chocolate Hamentaschen

3/16/2011

1 Comment

 
Picture
And we're back.

Funny how things work - the one week that I have a ton to say and a ton more pictures to go with those words, that is the week that the computer chooses to break. But, thank goodness, we are up and running now - and there are so many things I want to share. But it is 11:00 at night and bedtime took, I kid you not, over three hours tonight, in fact it just ended a short time ago. We've been having some issues lately.  

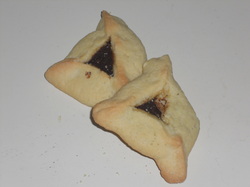
Anyway, so I will quickly share this very yummy hamentaschen treat that I made up all by myself, and I am very proud of myself because man alive, these are good. The hamentaschen I made last week were good too, but my second child, my four year old, declared that he hates Purim because he doesn't like that all the hamentaschen are jelly-filled and also that the graggers* are so noisy, and also because hamentaschen have jelly in them. That jelly thing really had him in a tizzy.

I asked what would make the hamentaschen better and he said "chocolate". Great! I could help! This was something I could actually fix!   

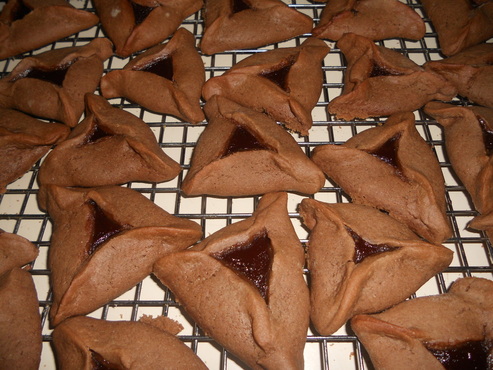
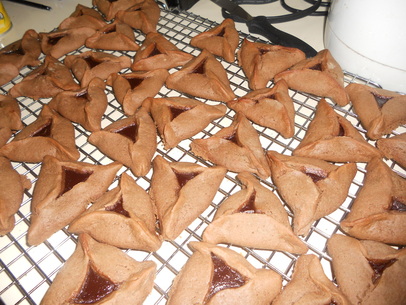
Feeling like a supermommy, I used the same hamentasch recipe I used the week before, but I added in three tablespoons of cocoa powder. Why three? I don't really know. Maybe because hamentaschen have three corners - but I really doubt that the reasoning was that deep. I picked three. I went with three. And it came out fine. I will say that the dough was much stickier with the cocoa powder added but that is to be expected because as my friend Alissa pointed out the other night, "chocolate makes everything stickier." And she's right. And so when I was rolling out the dough, I had to add extra flour and make sure that the countertop was extra floured, but all in all, the dough rolled out perfectly well.  

I will point out that I did not just dump the cocoa powder into the mixer. I mixed the cocoa in with the dry ingredients first and then added the dry to the wet - and it worked well.  

The recipe for the original hamentaschen can be found here. Just remember to add the cocoa powder and you're golden.  

For the filling, I used the simplest ganache recipe I could find, and then made it simpler. The ganache recipe I use on a consistent basis comes from The Cake Bible, possibly the most delicious cake book I own. And yet, even this recipe was too time-consuming for someone making hamentashen at 10pm.

So this is what I did instead: Melt four ounces of chocolate chips in the microwave and set aside. Pour an 8oz Rich's Whip into another bowl and microwave for 50 seconds. Stir and microwave for another 20 seconds. Pour the hot Rich's Whip over the chocolate chips and mix well. Once it's a very chocolatey color, you're done. The only thing is, and I forgot this when I was making the ganache, is that ganache needs time in the fridge to set so that it thickens up. At first I was all upset because I thought I couldn't use it in its current state. But you know what, it was fine even all melty. It doesn't really need to set if you don't have the time. Just be extra careful when spooning it onto the circle of dough and realize that you will have to work quickly once you spoon the ganache on to the dough. In other words, don't spoon the filling onto all the circles at once because the filling with spread off the dough. Finish one hamentasch at a time and all will be well.
Picture
So yeah, I made these chocolate-chocolate-hamentaschen and was so so excited to show my little anti-Purim boy his special treat. He, however, took one look at them and well, the conversation went something like this:  

Me: Look, Mommy made you special chocolate chocolate hamentaschen!
Him: Yuck.
Me: What do you mean? You said you wanted chocolate hamentaschen, I made chocolate hamentaschen.
Him: No, I wanted chocolate on the inside and vanilla on the outside.
Me: No. No. No. You said you wanted chocolate hamentaschen. That's what you said.
Him: I didn't. These are bad.  

I mean, it's not like I had anything else to do that day, you know? And I will not have a child not like Purim. Seriously, that's like having a four year old not believe in Santa Claus. Okay, maybe not the most appropriate analogy, but it's all along the same lines. Purim is a children's holiday. And so I made chocolate hamentaschen with vanilla on the outside. And they too were yummy.

Picture

*In case you were wondering, "gragger" is a yiddish word for noisemaker, for example, for the do-it-yourselfers, a gragger would be a soda bottle filled with beans. Tighten the cap and shake - specifically during the reading of Megillat Esther (the Book of Esther) on Purim, when the name of the evil Haman is read - or pretty much anytime from when your kids' teachers start sending their gragger projects home, say from about a week before Purim until you accidentally lose those graggers, about a week after Purim - if you're in a generous mood. Gragger is also the term my grandmother always used to refer to one of my grandfather's friends, an old crotchety man who talked too much. I will now use it in a sentence: "Ah Cholyera, here comes the gragger. Where's your grandfather?" I have no idea what "ah cholyera" means, but my bobby only used that term in very specific situations, none of which called for nice words, so I only assume that it is another lovely way to curse in Yiddish.
  
1 Comment

A No-Need-to-Sew Tutu

3/9/2011

0 Comments

 
Picture
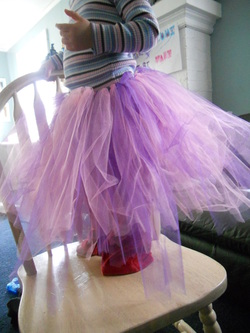
We're making progress - and the fairy-princess-ballerina costume just may have an end in sight.  

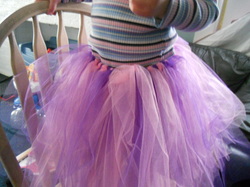
This morning I made the skirt for the costume - it's a cross between a tutu and a big tulle marshmallow. But the two year old seems to like it and that's all that really matters. Well, what I should really say is that now she likes it. When I first tried to have her try it on to see how much more tulle I needed to add, she was not happy. Her reaction was akin to what happens when she encounters sprinkles - her arch nemesis. Yup, afraid of sprinkles. I guess that's better than being afraid of the dark. At least one rarely encounters sprinkles in a dark alley, you know?
Picture
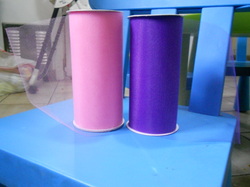
So how did we do this? It took one length of ribbon and 2 spools of tulle. I used one pink and one purple, each 25 feet long and six inches wide - and each were on sale for $2.17. Since the ribbon was already something that I had, the whole project cost me $4.34. Considering that I saw a tutu that was already falling apart at Walmart a bunch of week's ago for $17, I am pretty proud of myself.  

First I measured the ribbon around her waist and added an extra six inches on end. Those extra 12 inches would not be getting tulle, they would become the bow in the back of the tutu when it is tied on.

Picture
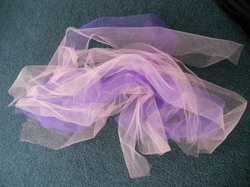
Then I cut the tulle into pieces, each around 2 1/2 feet long. It really all depends on how tall your daughter is. Mine is not on the tall side, so this tutu covers her knees by alot. At first I thought it was too long, but I figured I could cut it down after the fact. Better too long and in need of fixing then too short and well, then nothing can really be done - and I know that first hand. First hand? Yup. And you just know I will be telling a story now.

When I went for my last wedding gown fitting, something happened. I was standing there in the gown and the seamstress got a phone call and was yapping away and so, tired, I sat down. And the dress didn't. And that's when we realized that I had never sat in the dress before, something that apparently is very important. The dress kind of stood out in front of me, so my lower legs and sneakers (yeah) were on display. And that's when we realized that the tulle under the dress was slightly too short, hence the display of knees. Okay, not knees, but calves for sure.  

To this day I am not sure how the woman fixed it, or tried to fix it, but it was not perfect. The day was, the dress was not. And so when I sat on the bedekin chair, I couldn't lean back. I had to kind of perch myself on the edge of the seat so the dress wouldn't pop up. Somewhat irritating at the time, but years later a somewhat funny story.
Picture
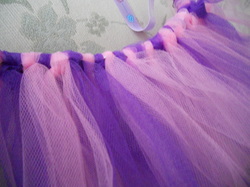
But I digress. Tulle is the topic of the day. So once all the tulle is cut into strips, start tying the tulle on the ribbon, one piece at a time. All you are doing is folding the piece of tulle in half over the ribbon, so that the tulle can be tied on. Tie a loose knot at the center of the tulle - I found double knotting made the whole thing puffier, so some I double knotted and some I did not. Keep going until the whole ribbon (minus those six inches on each side) is covered in tulle. Something to keep in mind - have the knots face down so the tulle lays flat. If the knots are facing up or out, the tulle will stand up or stand straight out. The goal is for all the tulle to hang straight down or else it will be hard to sit when the tutu is on. I hope the above picture kind of explains all that better than I can.

Once you covered the whole ribbon or run out of tulle, which happened to me, hold the whole tutu up and just move some of the pieces over on the ribbon so they have breathing room.

Picture
Have your little princess - or fairy-princess-ballerina stand on a chair and tie the bow in the back of the tutu. I feel like I will probably use a safety pin through the bow on Purim day, just to make sure it doesn't fall off. If you like, you could have also used elastic instead of the ribbon to make the tutu but not having an elastic and not knowing how to sew, I didn't. Although now that I am done, I realize I could have used a skinny stretchy headband as the base. Oh well, there's always next year.
0 Comments
<<Previous
    Are you a Mom?
    Of course you are,
    your shirt is dirty :)
    Read this

    Archives

    March 2018
    February 2018
    January 2018
    October 2017
    September 2017
    August 2017
    July 2017
    June 2017
    May 2017
    April 2017
    March 2017
    February 2017
    December 2016
    November 2016
    October 2016
    September 2016
    August 2016
    July 2016
    June 2016
    May 2016
    January 2016
    December 2015
    June 2015
    March 2015
    February 2015
    October 2014
    September 2014
    August 2014
    July 2014
    June 2014
    May 2014
    April 2014
    March 2014
    February 2014
    January 2014
    December 2013
    November 2013
    October 2013
    September 2013
    August 2013
    July 2013
    June 2013
    May 2013
    April 2013
    March 2013
    February 2013
    January 2013
    December 2012
    November 2012
    October 2012
    September 2012
    August 2012
    July 2012
    June 2012
    May 2012
    April 2012
    March 2012
    February 2012
    January 2012
    December 2011
    November 2011
    October 2011
    September 2011
    August 2011
    July 2011
    June 2011
    May 2011
    April 2011
    March 2011
    February 2011
    January 2011
    December 2010
    November 2010
    October 2010

Powered by Create your own unique website with customizable templates.
✕