We usually go all out for our teachers at the end of the year. I feel it's very important to not only show gratitude to our kids' teachers for everything they have done, but also to show the kids that we are thankful for the wonderful teachers in their lives. This year, however, the whole class got together and collected money to buy gift cards for the teachers. And so instead of doing what we would normally do, Josh and I decided to do something small for the teachers. We have also always felt that whatever we give the teachers should also include something from the kids. So this year we decided to buy plants for the teachers. And it only three (wait, four!) trips to Home Depot to buy these plants. The first time I went, I took the girls fifteen minutes before I had to get the boys from school. I figured it wouldn't take that long. Get the plants, get the flower pots and get out. But I was wrong. Apparently we came at the worst possible time - all the sprinklers were on so we couldn't even get close to plants. And then my fifteen minutes were up and we had to go. Our second trip to Home Depot occurred while I was obviously delusional because at some point while I was waiting in the carpool pick-up lane I decided that it would be a good idea to take all four kids to Home Depot - (right now!) - and get the plants. But I was wrong. It was a bad idea, and an hour and a whole box of Entenmann's Little Bites and a four pack of my emergency juice boxes that I keep in the trunk later, we were back in the car with flower pots and flowers - not plants. I really wanted plants, they last longer, but the boys fell in love with these flowers (I'm guessing here, but they look like daisies) and there was nothing I could say to convince them otherwise. We were also all wet because - you got it - the sprinklers were still on. 
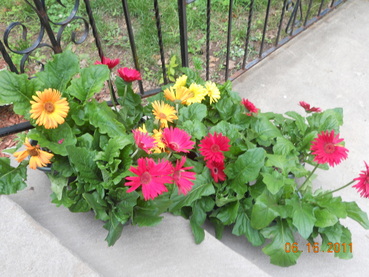
The flowers the boys picked were lovely - and, as we learned when we got home and dragged the plants, the pots and the kids into the porch - bug infested. So back out to the front steps went the plants and the pots. The kids? They got lucky - I let them stay inside. Later that night Josh went to return the flowers but he was running somewhere and didn't have time to get new ones. So the next day I went back to Home Depot, alone, where I was greeted like a long lost friend by the woman manning the cash register in the plant section. I explained what I was looking for and she kindly directed me towards plants that would not only survive if any of our teachers forget to water them but that would survive being transplanted into flower pots by four year old hands. And I was grateful. 
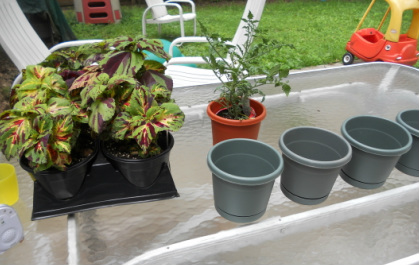
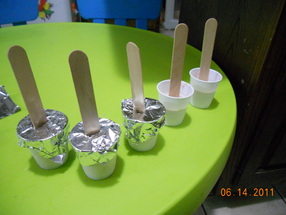
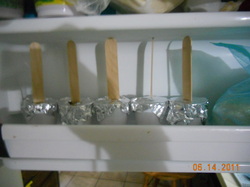
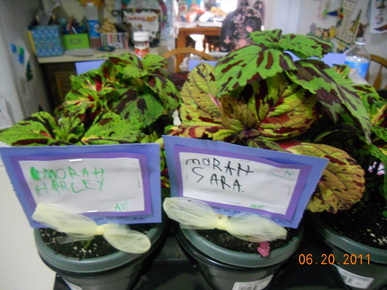
When I got home, the kids and I replanted them in nicer flower pots. The kids make little signs for each teacher that we glued to Popsicle sticks that we then stuck into the soil. Tied a little bow around the Popsicle and, for the most part, hand delivered them to the teachers' houses. And the fun part? You're thinking the fun part is that I made a new friend at Home Depot. That was fun, and might potentially come in handy one day, but not what I was going for here. No, I was thinking that because the teachers were not home when we delivered the flowers - they were all at a teacher meeting in school so we left the plants on their front steps - we got to have the fun of leaving them a surprise for when they got home. And from the phone calls we've gotten, I'm pretty sure they were a hit. Oh, and because I always need a catchy little phrase, no matter how corny, we wrote "Thanks for helping us grow this year." Get it? Grow? Like a flower. Yeah, I know, I know, but just getting the plants took so long. I ran out of time to think about the rest.
Today I present the third and final sugar-free cookie that we gave my dad for his birthday. We baked all three recipes in one afternoon, one after the next - and the whole project didn't take that long. These were the last to go into the oven and I think I can say, these were the easiest. The rugelach were the hardest and the peanut butter, while also very easy are slightly more time consuming because each cookie needs to be flattened out on it's own or else you will wind up with peanut butter balls, not an altogether tragedy, just now what we were going for this time. For the cookies, you will need: 1 1/2 cups unbleached flour 1 teaspoon baking soda 1 cup Smart Beat margarine 3/4 cup Splenda Sugar Blend for Baking 1/4 cup Splenda Brown Sugar Blend 2 large eggs 1 1/2 teaspoons vanilla 2 1/2 cups uncooked old-fashioned oatmeal 1 cup chocolate chips Here's the how to: Preheat your oven to 350 degrees and lightly spray two cookies sheets with cooking spray. In the bowl of a standing mixer, mix the margarine, both Splendas, the eggs and vanilla until totally mixed. Slowly add the flour and baking soda and mix well. Add in the chocolate chips and oatmeal and combine by hand, until blended. Use heaping tablespoons, drop the batter onto the cookie sheets. Bake for 12 minutes or until lightly brown. Remove from the oven and allow to cool before storing in an airtight container. This recipe made 2 dozen pretty big cookies but these can always be made smaller to yield extra cookies. Are they good? I don't know. I try not to eat things with sugar substitutes, but my Dad loves them!
Nothing strikes fear in a mom's heart like that week between school and camp. An entire week looms ahead, empty of routine but full of mommy playing short order cook, wrestling referee and playdate chauffeur. And this is that week, my friends. Let the games begin. First things first, we made dessert for tonight's dinner. The first real day of vacation deserves something special, and also, this was a group activity with all the mixing and tasting and stuff. So remember how we were drowning in strawberries last week and the best I could do without having to turn on the oven and actually baking something was strawberry preserves? We also made these strawberry frozen yogurt pops. And they were such a hit with the kids, we made them again today. Wait, truth is not all the kids loved them, but in this house, 3 out of 4 is the most I can hope for and they did not disappoint. Three kids gobbled the yogurt pops up and one requested that we make them again, but this time leave out the gross strawberries and use chocolate instead. It's not a bad idea, I can see these being excellent with chocolate. The original recipe for these pops came from familyfreshcooking.com, a blog I recently came across and really like. The recipe initially called for watermelon to be used as the fruit, but I while I love frozen fruit bars, I am not a fan of watermelon ones. In case you were wondering, I tend to like the citrusy ones better, like orange or lemon, and sometimes even lime. But my kids really like strawberries, so we tried this: In a bowl, we mixed - 6 tablespoons of plain Greek yogurt - 3 tablespoons of strawberry preserves or pureed strawberries - 1 tablespoon sugar
Then we realized that it wasn't really mixing very well. The yogurt was only turning vaguely pink, but we were looking for something darker. So out came the dairy hand mixer. We didn't used to have a dairy hand mixer, we used to just have a dairy spoon but an unfortunate mistake led to the happiness that is a dairy hand mixer. We mixed, everyone had a turn holding the mixer and finally, the strawberries were incorporated well enough to make the yogurt turn dark pink. Hooray! We divided the yogurt mixer into five mini cups - we used the disposable plastic ones that one would find in a bathroom. We filled each cup about halfway and then we inserted a Popsicle stick into each cup. I wasn't at all sure that the sticks would stand straight but this Greek yogurt is pretty thick so it was fine.
Cover each cup with foil, poking the Popsicle stick through the foil and freeze until they are firm.
It's the last day of school! Yippee! I made this End Of School Happy Summer banner the other day and had been planning on hanging it outside so the boys could see it when they came home from school. And then it rained last night. And again this morning. And now it's raining again. I might have to take a boat to pick them up from school.
Anyway, you too can make one of these in less than ten minutes and make a kid's last day of school more special than it already is.
Here's what I did in five quick and easy steps - and the best part - at least for me - no sewing! Saying that just makes me smile.
Step 1: Grab some colored paper and some scrapbook paper you are not in love with and don't mind parting with for a small project.
Step 2: Cut the colored paper into pennant-style triangles. Cut an equal number of triangles from the scrapbook paper but make them slightly larger than the other triangles.
Step 3: Staple the smaller triangles on top of the larger ones. Step 4: Using a thick marker and using your nice handwriting, write Happy Summer on the triangles, one letter per triangle.
Step 5. Staple each triangle onto a length of ribbon or string, making sure to leave some extra string at both ends so you can hang your pennant. And you're done! Our pennant in hanging in the porch, all safe from the rain. But it's fun either way, and yay, summer's here!
Happy Summer!
In my life, I don't think I have ever thought, "hey, let's make some jam".
I mean, in theory I guess I knew that perhaps many many years ago women possibly made some jam at the same time that they churned butter and beat their laundry on a rock down at the river. But now? Shoprite carries a very nice selection of bread condiments; making my own jelly was up there on the list with making my own cottage cheese.
However, when fate collides with well, strawberries, you just can't ignore it.
I had been spending some time the other day trying to unclutter (declutter?) the shelves on my porch. They have been in a very bad state for a while now (since we moved in, but shhh) and the time had come to sort and purge. One shelf had a huge stack of magazines that for whatever reason, I had saved. So the other night I sat down for an hour and flipped through the magazines, only stopping at pages that I had folded in, meaning something had, at one point in time, looked interesting to me. If that something still looked good, I tore out the page and stuck it into my all-the-things-I-would-like-to-do-but-never-have-time-to-do-ripped-magazine-pages file. But that's a whole other story.
One of the articles that I came across was called "So Many Strawberries and So Little Time". Or something like that. Okay, fine, it wasn't called that at all, but it was all about strawberries and what one could do with them should one find themselves surrounded by strawberries. And then the light bulb went on and - Hey! That's me! And if you have been following along, you will know that these days, I am surrounded by strawberries.
The article was long and full of complicated things like rolling pie crust and buying rhubarb. But at the end of the article, there it was. The recipe for me. It was short, simple and to the point. Strawberry preserves. The recipe basically said to chop up all your strawberries, throw them in a big pot, add some sugar and lemon juice (from a real lemon, but whatever) and simmer for 45 minutes. I could do that. So I did. I threw about a pound and a half of chopped strawberries in a pot, added a half cup of sugar and one tablespoon lemon juice. I let it come to a boil and reduced the flame to a simmer and let it go to town for 45 minutes. I set the timer to ding every seven minutes so I would remember to stir the strawberries so they wouldn't burn and after 6 dings and a little, my strawberries were ready.
I let them cool and then, like the article said, stored them in an airtight container. But here's the thing, I didn't think a Tupperware was going to cut it and also, I didn't want to stain my Tupperware red from all the strawberries. I looked in the closet where I keep all the recycling (aka the recycling closet) but there weren't any big glass jars there - but there were a bunch of glass baby food jars. Good enough. My yummy strawberry preserves now live in the fridge, inside baby food jars. If the article is right, it should last for a month.
And because I am a huge crafting geek, I made labels with my beloved Sharpie markers for each glass jar. I know. I'm embarrassed to even show you. Huge geek. Huge. Geek.
My kids love to go apple picking but since there are no apples yet, I thought they might like to go strawberry picking - which apparently you can only do for something like five minutes in New Jersey. If you blink, you miss strawberry picking season. I hesitated before taking the kids because it's really a very far drive and I am not a fan of driving long distances, especially when I don't know where I am going - but happily, I didn't hesitate for that long and there were still some strawberries waiting for us.
So one morning last week, we piled into the car, drove for a good hour, stopped to use the potty seven times, threw three bags of snacks and an equal number of juice boxes over my shoulder to the back of the van, parked at the farm and had lunch (it was 10am but you know my motto, "never leave home without a stocked cooler - or at the very least, a sandwich." Yeah, it's a long motto, but one that serves all mommies well.) After lunch, we picked strawberries for twenty minutes. Then we looked around and realized, hmmm, there is nothing else to do here besides pick strawberries. No hayrides, no corn mazes, no other fruit waiting to be picked. Nothing. I guess it was really early in the season for these pick-your-own farms. My first clue should have been when the woman at the farm actually looked surprised when I said we were here to pick strawberries. Whatever, we had fun, took awesome pictures and paid for our many many strawberries.
And then we were faced with a long drive home. I just couldn't do it yet. So we GPSed our way to the local Walmart and as luck would have it, it was only half a mile away. See? Even in farm country, you're never too far from civilization. Next up: What in the world did we do with all our strawberries? We ate some. And then we ate some more. And then some more. And then we shared with friends. And then the kids said no more, but there was no way I was chucking these guys. We still had some left, so we got busy in the kitchen. I'll show you next time.
If you have been following along, you might remember that my kids decorated these boxes for my dad for his birthday. They want to fill them with treats - my kids have been very into baking lately. My father, however, can't have sugar due to his diabetes. I am always finding recipes that use a sugar substitute but most of them are not very tasty. These, however, take the cake. Or the rugelah, as the case may be.
We also made sugar-free peanut butter chocolate chip cookies that you can see here and some oatmeal chocolate chip cookies that I will be sharing soon.
Here is what you need for the dough: - 1 cup reduced calorie margarine - we used Smart Balance (or maybe Smart Beat, I can never remember what it is called) - 8 ounces reduced fat cream cheese - 3 cups flour
Mix all until smooth, wrap in plastic wrap and chill for an hour.
For the filling: - 2 tablespoons cocoa - 1/2 cup Splenda Sugar Blend - 1/2 cup oil
Mix all and set aside.
Preheat the oven to 350 degrees. Following the directions for these rugelach here, shape your sugar-free rugelach and place them on a greased cookie sheet.
The only difference here is that instead of dividing the dough into four sections, I divided it into three - and when it came to cutting the triangles, instead of cutting each circle of dough into 16 triangles, I only cut these into 8 triangles. Yes, there were fewer rugelach in the end, but I was getting verrrry tiiiired.
Bake at 350 degrees for 20 minutes. Allow to cool completely and freeze until your dad's birthday. Or you know, eat them now. Either way works.
So here's the deal with birthday parties in school - they're great because you don't really have to do anything except show up. The fabulous teachers play the party games, make the birthday crowns and provide general crowd control.
The downside? You have to do everything beforehand and then lug it all to school, and if you're me, you do all that lugging and dragging things while pushing the girls in the double stroller. Fun. Oh, and to make it even more fun, the first party - at 10am - is when the baby usually naps and the second party, at 11:30am is when my two year old naps. Just add two whiny girls (one with two skinned knees courtesy of walking to the car before the party) who've had more sugar in one morning than they normally have in a week and yeah, you know, it was a paartyyy.
Anyway, in a misguided attempt at efficiency, I scheduled birthday parties for both of my boys on the same day, this past Friday. My older son requested ice cream cones instead of a birthday cake. No problem. I packed all the ice cream in the cooler and the cones, the chocolate syrup, and the sprinkles in my backpack. I even remembered napkins and an ice cream scooper. I was mommy of the year. Until I got to school and dang it to heck! The sprinkles had the following printed in teeny-tiny letters on the back: "Manufactured on the same machinery as peanuts, tree nuts, milk, eggs, soy and wheat". Our school is nut-free. So really, I probably could have taken out a sizable percentage of the school with these rainbow sprinkles. Sheesh. So no sprinkles for us. So sad. So were the kids. And the insane part, no one would have even asked for sprinkles had I not brought them, but once they saw them, they wanted 'em. We placated them with seconds on the ice cream.
My younger son had a simpler request. Doughnuts. The girls and I had made a Dunkin Donuts run that morning after we dropped the boys at school. There are 16 kids in my son's class but I counted on two teachers and my girls eating doughnuts too. So that made twenty. Okay, fine, who I am kidding, I wanted one too. So 21 doughnuts. And 21 is a weird number, but 24 - that's two boxes of doughnuts. Perfect.
I ordered my two dozen doughnuts from the nice Dunkin Donuts lady, and knowing that when I order four donuts for my kids I pay four dollars, I handed her a twenty and a ten while talking to another mommy who was ordering her own stuff at the same time and I guess I wasn't listening to the price.
The Dunkin Donuts lady handed me back the ten - and then a nice amount of change from the twenty! Yahoo! Apparently it's so so so much cheaper to order doughnuts by the dozen than it is to order singles. Who knew? Live and learn.
So anyway, what is my point here? The point here was my party favors. I really dislike regular party bags filled with lollipops and candy and some small plastic choking hazard of a toy that winds up in the baby's mouth.
And the part I dislike the most - you might think it's the choking hazards, but really it's the actual party bag. It hurts me to buy these plastic bags. They wind up right in the garbage and yet they are so expensive because they are printed with the characters from Toy Story 3. Seriously.
So like last year, I went a different way. Last year, I spent a buck per kid and handed out full size shovels and pails for the beach. I painted each kid's name on them with a paint pen and they were a huge hit.
This year though, there are way more kids and a dollar a kid seemed like a lot - it would have been over $50. I wasn't sure what to do, but when I went to the Dollar Store for inspiration, I found it.
22 ounce plastic cups in bright colors - and, and, they were 4 for a dollar. Yeah, you heard me right, four for a buck. Go get some. They're at the Dollar Tree. Go now, I'll wait.
Are you back? Good. So once again, using my trusty box of paint pens, I wrote each kid's name on a cup and filled it with a small bag of potato chips and two licorice sticks. Yeah, I know, I don't like to give out candy, but I also can't have my child being the weird kid who doesn't have any nosh in his party favor. Man alive, the neuroses of being a mom.
What's the best party favor you ever gave out?
Thanks so much for reading!
So this time the rugelach actually came out like they were supposed to - as opposed to last time when they did not at all do what they were supposed to do.
This time, however, I used a dairy dough, with cream cheese in it, in honor of Shavuot, where there is a custom to eat dairy foods. I rarely bake anything that is dairy, my kitchen is just not equipped for it. I only have one dairy cookie sheet and one dairy mixing bowl and no dairy measuring cups, so baking dairy cakes and cookies is always an adventure. And this time was no exception. And yet, shockingly, these came out very good.
Here's what we did: Dough 2 and 1/2 cups flour 1 eight oz package of cream cheese 1 and 1/4 cups margarine 3 tablespoons sugar
Mix all of the above until a dough is formed. If you have a mixer that you use for dairy ingredients, go for it. If you're like me, mix all the ingredients together in a bowl, using a large spoon and all the muscles in your arms. When it becomes too difficult to use the spoon, move the dough onto a floured counter top and knead it until it is smooth. It's not a sticky dough so it shouldn't make too much of a mess on your counter. Whew!
Shape the dough into a ball, wrap in plastic wrap and refrigerate for about an hour, or until the kids go down for a nap. Either one. Once the dough has been chilled, preheat the oven to 350 degrees and unwrap it and divide it into four sections. Roll out one section into a circle, about 10" in diameter. There's a trick to rolling out dough into a circle. It doesn't always work for me, but it works often enough - and who knows, it might just work for you all the time. Here's how it goes: As your use the rolling pin to roll out the dough, rotate the dough clockwise 45 degrees after every fourth time you pass the rolling pin over the dough. That way the dough forms rounded edges instead of becoming a rectangle like when you only roll in one direction. Make sense? Anyway, once you have something resembling a circle, wash your hands and make the filling. Of course you can do this beforehand, like when the dough in chilling, but I forgot. To make the filling, combine 1 cup sugar, 4 tablespoons cocoa and 1/2 cup oil. Spread 1/4 of the filling over your circle of dough. Using a pizza cutter, crisscross the dough into 8 triangles, and then do it again to make 16 triangles. If you would like to make larger rugelach, leave the 8 triangles, but today we are making mini ones, so 16 triangles it is. Carefully roll up one triangle at a time, starting from the wider or outside section of the triangle, rolling towards the point of the triangle. Move the rolled up rugelah to a greased baking sheet and continue on with all the triangles. Rinse and repeat with the other sections of dough. Once the pan is full, brush the rugelach with beaten egg yolk and bake the rugelach for 15 minutes, or until they turn a light golden brown. Allow them to cool completely and store them in an airtight bag or container. These freeze very well but they also last for a good week if they are stored properly. The recipe make 64 mini rugelach.
I thought these were really good but the real test will come tomorrow morning when the kids wake up and taste test them. We'll have to wait and see if they're lunchbox worthy.
Too busy make one very quick, very last-minute Shavuot flower project? I know you think are, but really, if you can squeeze less than five minutes out of your day, you too can have a pretty flower garland to hang on your wall. No really. I'm not kidding when I say less than five minutes. In fact, you can read this post and make the project and still have it done in five minutes. Don't believe me? Try it.
Take five pieces of brightly colored cardstock or scrapbook paper or construction paper, although cardstock and scrapbook paper work best as they are generally square shaped.
Draw a basic flower, freehand, as large as you can on one paper. Stack the pages and following the line of the flower, cut through all the pages at once to make five flowers.
Grab a piece of tissue paper and make about 40 small tissue paper balls. They don't need to be perfect, just scrunch them up as fast as you can. Using a glue stick, put a generous amount of glue in the center of each flower and press the tissue paper balls down on the glue. (Fair warning: if you use regular white glue instead of a glue stick, you won't be done in five minutes because you will have to wait for the glue to dry. So even if you have to go digging in your kid's backpack to find a gluestick, it's worth it).
One all the ballies have been glued on, put your first two flowers next to each other, overlapping one petal from each flower. With a hole puncher, punch a hole through both flowers at once and secure with a paper fastener. We previously enjoyed using these very handy little fasteners here.
Continue the garland by adding another flower to the row and punching another hole through the overlapped petals, continuing until all five flowers have been attached.
And guess what? You're done. Tape the garland to the wall and stand back and admire your speedy handiwork. Your wall has come alive and you're only out five minutes of time. Now you can go back to baking your Shavuot cheesecake.
And as I stand here gazing at my pretty flowers, I realize this is not just a decoration for Shavuot - it can be an anytime project, it's that pretty. And it's not coming down that fast either. But when it does come down, it's going into the Sukkah decoration bin.
For another flower project idea, click here .
|