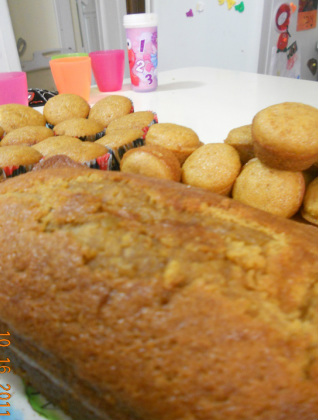
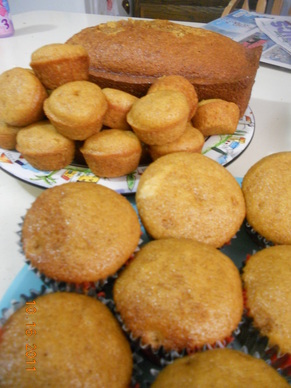
The kids and I made these for dinner the other day. Every single kid tasted
them and two of them actually kept eating after that first bite. The other two
had cream cheese sandwiches. Hey, you can't please everyone.

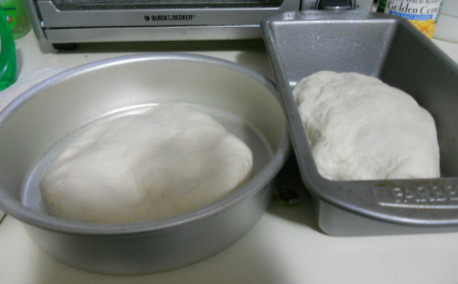
We starting by making a batch of pizza dough and sauteing some mushrooms
and spinach.
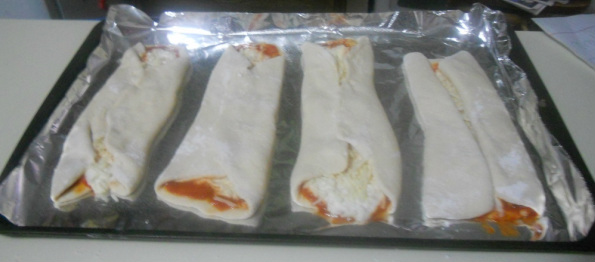
I divided the dough into eight pieces, and each kid rolled their piece of
dough into something resembling a circle. They topped it with sauce, a little
ricotta cheese, shredded mozzarella cheese and if they wanted, mushrooms and
spinach. Only one little girl wanted to. I rolled out the rest of the dough,
added the other ingredients and folded both sides over themselves so the edges
almost met.

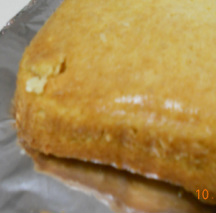
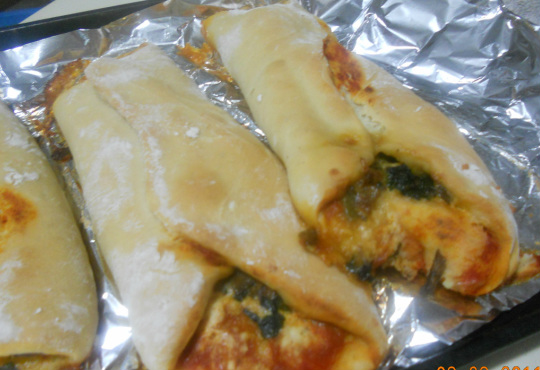
Brush the dough with a beaten egg and bake at 450 degrees for 15 minutes or
until the tops of the calzones are golden brown. 

Fast, yummy and an activity. What more can I ask for?
Like what you've read? Leave a comment please!
 
 
This afternoon, I baked bread. I'd never done that before. I've made
challah before, hundreds and hundreds of times, but I've never baked an actual
loaf of bread that can be cut into slices and used for sandwiches. It's
something that I have been wanting to do for a while, and then I came across
this recipe for Simple One Hour Homemade Bread on Amanda's Cookin website, a
blog that has never posted a recipe that has failed me. So I went for it - I
mean, why not, you know? The recipe claims the whole thing from start to finish
takes one hour and that includes rising. And you know what, it did take just one
hour, and it was so easy that I actually made the dough after the kids
came home from school, something I would usually avoid at all costs. I try to
avoid doing anything at all once they are come home, so this was an adventure
for all of us, albeit a short lived one. And you wanna know why it was so short?
Because it took only 2 minutes to throw all the ingredients into the mixer, six
minutes to mix, less than a minute to divide and move the dough into pans and
cover them and the rest of that minute to walk back to the living room with the
kids and turn the TV on.

Amanda's recipe can be found here.
Here is my recipe, I played with it a little, not because I doubt Amanda,
but more because it was pouring out and very humid outside and I know from the
trial and error of making challah that a day like today needs less water. I also
used a little more sugar because I always find that challah dough recipes are
always slightly less sweet than I like so I assumed that the same rule would
apply to bread recipes. I guess this is all kind of how Amanda played around
with the original recipe that she started with. She calls her bread 'the midwest
version' based on where she lives. I guess this can be the northeast version. 


Here's what I did:
5 and 3/4 cups of flour
4 tbsp sugar
1 ans 1/2 tsp salt
1 packet of rapid rise yeast*
1 and 1/2 tbsp oil
1 and 1/2 cups warm water

Pour all the ingredients into the bowl of a standing mixer. Using the dough
hook, mix on low for 1 minute and then on medium for 5 minutes. At that point,
my dough was totally smooth and elastic. If yours is sticky, add a small amount
of flour, maybe a tablespoon, to the mixer and see what happens. I wouldn't add
more flour than that, but I would stop the mixer if the dough is very sticky and
knead it by hand (with floured hands on a slightly floured counter) for a few
minutes to see if that helps.
Divide the dough in half and put each piece in a greased pan of your
choice. I put one in a loaf pan because the idea of making a loaf of bread in
the shape of an actual loaf of bread was very appealing to me. Okay, I'll just
say it, I was giddy with anticipation. I couldn't find my second loaf pan so I
used a round one and made a circular loaf of bread.

Lay a towel over the pans for 25 minutes. Preheat the oven to 350 degrees,
set the timer for 25 minutes and walk away. When the timer dings, put the pans
in the oven and reset the timer for 25 minutes. Walk away again. Come back when
the timer is done and the loaves are slightly light brown. The original recipe
said they would turn golden brown but mine never did and I didn't want to leave
them in the oven too much longer for fear they would dry out.

The bread cooled for a few minutes and the kids were so eager to taste it
that I cut into it. We tasted - and then we all spit it out at the same time. I
could not believe it. How could the bread be this bad? So as my mom would say,
back to the internet! And we took a look at not only Amanda's recipe but the
blog where the original recipe came from and one of my very observant boys
noticed that both of the other bakers spoke of eating their warm bread with
butter on it. One of them even had a video showing just that.

So back to the kitchen. One kid found the butter and the others crowded
around. We cut, we topped the slices with butter and man alive, it was awesome!
A few of the kids even danced. And Josh chose that exact moment to come home. We
shoved a piece of buttered bread at him and he actually tried it (trying a new
food is big for him) and you know what, he liked it! And the bread angels sang.
All six of us liking one food. Unheard of.


*The real recipe called for SAF instant yeast. I wasn't sure what that
was and it was pointed out that rapid rise was okay to use too, which worked out
well because that's what I had. 
 
 
I must start off by saying that decorating a cake with a 20-month-old must be a lot
like decorating a cake with a pack of monkeys. Drunk monkeys. They reach, they fall,
they laugh, they stuff things into their mouths and most of all, they try to help.
Except they don't really want to help, they want to do it all "self"!

And now that I've shared and put that out there, I can show you what I made.
This morning, baby and I made a rainbow cake in honor of this week's
parsha, or Torah portion, the story of Noah. Last year we made
animal sugar cookies, marching onto Noah's teiva or ark. 
We started off simply enough, with a 9x13 Duncan Hines yellow cake, cooled
and turned over so the flat bottom was on top; much easier to decorate a flat
cake than one with a mound, baked that way because your oven is off kilter and
you have no idea what to do about it.

To make an extra fancy cake tray like the one you see in the picture,
just flatten an extra large cereal box or grab a piece of cardboard and wrap it
many times in foil. Tape the ends of the foil together on the bottom, turn over
and yahoo, a tray!

Center the cake on the tray as best as you can and set it aside.
Next, gather together all the tools that will make this go as smoothly and as
quickly as possible. You will need the larger container of vanilla Duncan Hines
frosting*, food coloring in the colors of the rainbow (either liquid drops or
gel colors, I used gel because that's what I have around), toothpicks, 6 plastic
cups, 6 spoons, and a small offset spatula. And something for the baby to do. In
this case, she played with the small and tightly closed - I repeat closed, tightly,
my friends, tightly
- gel food coloring pots. Because getting that stuff off your hands
will seem like a walk in the bakery compared to getting it off a squirmy toddler's hands
and neck and ears and feet. 

Do what you will, I'm just giving fair warning.  
Divide the frosting between the six cups and stick a spoon in each cup. Tint
each cup a different color (Let's sing, all together now : Red, orange,
yellow, green, shiny blue, purple too, all the colors that we know, shine up the
rainbow!
One more time, with feeling now!) I used the toothpicks to put
some of the gel coloring into each cup. Be sure to never stick a toothpick that
has been in the frosting back into the gel coloring, you'll ruin the whole pot.
Instead, if you feel you need more color in your frosting, use a new toothpick.
Don't be stingy, it's a toothpick. Just get up and get another one. If you are
using liquid food coloring drops, just squeeze a few drops into your frosting,
mix and see what the story is before adding more.
Use a knife to kind of sketch out your rainbow on the cake. Don't drop the
knife into the cake, taking a chunk of cake off with it, like I did. But if you
do, don't cry. It'll be okay, just kind of smoosh the piece back in, it'll be
fine and covered in frosting and no one will know but you. I promise. 
I frosted the top section of my cake, on the sides with blue for the sky. I
was planning on frosting the bottom with green to make grass but I ran out of
room, but by all means, do so. It sounded really cute in my head. It also sounded really
cute to parade animal crackers across the bottom of the cake, but I didn't have any. But
if you do, go for it, I would if I were you.

 
Then I used each color and filled in the rainbow, all the while having the
baby sit on the counter next to me, trying to eat the cake and the purple
frosting. Looovved the purple frosting. And learned a new word today,
poople. Perhaps I should call this the "one-handed-frosted-cake".

Once the rainbow was done, I realized the sides of the cake were still
naked. I didn't have enough frosting of any one color to finish it off so I just
used all the colors. Looks like a kindergartner did it, kind of in keeping with
this whole experiment. 
And then we were done, almost. Because store bought frosting just doesn't have
enough added sugars and poisonous dyes, I added some kind of store brand
fruit loop cereal. I matched up the colors of the cereal with the frosting and there ya go,
a rainbow cake.

I had a thought to use sprinkles, but my sprinkles are rainbow colored, all mixed
together and the thought of separating the sprinkles into colored piles made my
knees go weak and not in a good way, so fruit loops it was. Although, I must take a minute
to share here and tell you that I do have a good friend, mentioned on this blog
more than once, that once did just that. I won't tell you who, but I will tell you that
she spent a considerable amount of time searching for the white sprinkles in a box
of assorted ones, in order to decorate a sushi cake. No, really.

Anyhow, I'm not sure what the protocol here is, but I am going to cover it
very loosely with foil and store it in the fridge. 
 
 *did you know that this stuff is now non-dairy? I learned that this
past summer when I sent Josh to Shoprite for chocolate chips and he came home with chocolate chips AND frosting. So fun and so much easier for the kosher baker!

If you like what you've read, leave a comment please!
 
 
Like much of the free world, we went pumpkin picking last week. We got
lucky though, the weather was beautiful, even a little hot for my sweatshirt
clad kids - (it looked so chilly that morning!) And our luck continued when we
got to the farm because Tuesday mornings are "free admission mornings" (yahoo,
those are Josh's three favorite words!) and there was almost nobody else there.
Perfect for my kids, they're anti-crowds.

And so now, a week later, I have a box of pumpkins sitting out on my front
steps, waiting for me to bring them in and introduce them to their new home. And
why are they outside? Because some of them were pretty dirty and my mom said I
should leave them out in the rain to get cleaned off. If you know my mom, you
can laugh now. If not, then don't you laugh at my mom! She's my mommy! 
 
Here are some pictures from the farm, probably more than I would normally
share but my blog hoster just unveiled a cool new slideshow feature and I need
to play with. Point your arrow over the big picture and you should then be able to click "play".
Next week: Pumpkin projects. Yahoo!
 
 
My three year old came home from nursery the other day, all upset, because 
it was her turn to be the weather helper, or as she said it, the weathergirl -
yup, that's the word she used, and as luck would have
it, she was wearing a short little skirt and fitted t-shirt that day
-
and she didn't know which weather system to pick - hot, cold, cloudy, sunny. She
was all confused.

Today was like that again. Cold, cloudy, sunny, hot. I call it Mr. Roger's
weather. You start the day in a sweater and maybe even a coat, and most likely,
if you are just driving through the drop-off line in the morning, with your
pajama pants still on. Then the day goes on and you exchange your sweater for
something lighter, a cardigan perhaps. And by the time you've run all your
errands and made dinner and you're back in the pick-up line at school, you're so
hot that you've totally unzipped the cotton hoodie that you exchanged for the
cardigan hours ago and pushed the sleeves up as far as they can go and cranked
up the air conditioner. Except that it takes a while for the a/c to kick in
because you've forgotten that knobs are all turned to the heat setting, courtesy
of the winter weather that blew through town in the morning. You see? Just like
Mr. Roger's, with the constantly changing clothes and shoes every time you come
in or leave the house.

I don't like this weather. But the weather isn't the thing that I liked
least about today. It's spelling tests, of the first grade variety. I didn't use
spelling tests as my "thumbs down" during bedtime because that would not have
been constructive parenting, and I would never tell any of my kids this, but I
don't like spelling tests, and more than not liking spelling tests, I don't like
studying for them. And yet, this afternoon, I learned that spelling tests will
now be a part of our Friday lives for the foreseeable future.

It's not that I don't like words. I love words. I love manipulating them,
using a weird phrase, getting paid to write them (hint. anyone out
there looking for me?).
But something about writing  them over and over
every night of the week, just to get ready for a test on Friday, never appealed
to me.

So when the spelling list came home today, I was less than enthused. But
then, while I was rocking the baby to sleep (yes, I know she's not a newborn, so
sue me), I had time to think about the spelling words and what to do about them,
and more importantly, what to do with them so that a very tired first
grader will be open to practicing them nightly, as part of his homework,
preferably without too much complaining.

This was the first thing I did:
I wrote all the words out on slips of paper, using my best preschool
teacher handwriting, and hung them on the back of the front door. Surely seeing
something over and over will help with retention. Right?

And then I had a few other thoughts that might help. I feel like some of
these might appeal to some kids, while other might be liked by other kids.

In no particular order:
1. Use Scrabble tiles to spell out the words
2. Type the words on the computer
3. Use a cookie sheet and some ABC magnets and spell away. Or even sit in
front of a radiator or fridge and do the same.
4. Play hangman with the spelling words
5. Make a word search for your child


Will any of these ideas work? I have no idea. Have I implemented any of
them? Nope. They're just thoughts at this point, but these have to be better
than the memories I have of folding my sheet of looseleaf paper in thirds and
writing each word over and over until I couldn't straight.

Let me know if you use any of these and if they worked. I'll do the same. 
If you've liked what you read, leave a comment please!
 
 
This is what greeted me when I came down to the kitchen this morning.
Almost scared the pajamas off of me, but the baby was so proud of herself,
feeding tea biscuits to the monkey's nose. And her little game kept her busy
while we baked a little while later.

You see, 'tis the season for pumpkins. And since Josh was gone for so long at
shul this morning, we made pumpkin  muffins. And mini muffins. And a pumpkin
bread. All from one recipe. Does it get better than that? Not from one 15 ounce
can of pumpkin, that's for sure. 
The first time I tasted anything pumpkin related, I was in California for
my uncle's wedding. In 1987. All the other kids were running around but my Bobby
Toby and I were sitting at the kiddie table, inhaling pumpkin muffins. My Bobby
Toby is no longer with us but for years, we had tried to recreate the same
delicious muffins we had had in 1987. And we couldn't. I think my Bobby's
problem was that she didn't bother to look for a recipe, she just winged it. I,
on the other hand, was always trying to make a "healthy" pumpkin muffin,
following different recipes, with flax seed and whole wheat flour. Then I pulled
out my old pumpkin bread recipe that I always tried to play around with and instead of using weird ingreidents, I just replaced some of the sugar with less sugar
and switched the margarine for oil. 
 
Instead of using the three cups of sugar that the recipe listed, I used two. Still awful, I know. But one taste of these muffins and I was back in California with my Bobby Toby, wearing my burgundy colored crushed velvet dress with white tights and shiny black mary-janes. And a matching velvet headband with a bow. Stuffing muffins into my mouth. Memories. These are deliciously unhealthy and definitely a once-in-a-blue-moon treat. Today must be a blue moon kinda day.
Here is the recipe, with my modifications:
1 15ounce can of pureed pumpkin, not pie filling
2 cups sugar
1 cup water or soy milk
1 cup oil
4 eggs
3 and 1/2 cups flour
2 teaspoons baking soda
2 teaspoons cinnamon
1 teaspoon salt
1 teaspoon baking powder

Preheat the oven to 350 degrees. Grease whatever pans you'd like to use. I
used one loaf pan, one muffin pan with 12 spaces, and one mini muffin pan with
24 spaces. 

In a bowl of a standing mixer (or by hand), mix the sugar, soy milk or
water, oil, eggs and pumpkin. Add the dry ingredients and mix until combined.
Pour half the batter into the loaf. Start baking the loaf pan right away because
that pan takes the longest, at about 50 minutes, but start checking it at 30
minutes to be sure the top isn't burning. I tented my loaf pan with foil at the
35 minute mark and left it like that until it was done, about 15 minutes later. 
 
Then pour the batter into the mini muffin tin and bake that on the other
rack. These take the shortest, coming in at about 11 minutes. Next fill the
regular sized muffin pan, move it to side and wash the dirty bowl and spoons. By
now the mini muffins should be done and the regular sized muffins can go in. The
regular sized ones took about 18 minutes to bake.

Let cool and eat. Or store in a Ziploc bag on the counter. Or wrap in foil
and stick in a labeled freezer bag and freeze. All good options. And just think
how lucky we are to have freezer bags to keep the food we work so hard on from
getting freezer burn. There were no dedicated freezer bags in 1987. That's why
we had to eat all those muffins. We were really just doing a service to the
hostess. 
If you like what you've read, please leave a comment!
 
 
The weather has been weird lately - the other day hit the mid-80's for like
the third day in a row, and it's mid-October. But I guess I shouldn't be surprised,
autumn isn't really a season anymore. It's more like a week, if we're lucky.
It'll probably be snowing in another week or so.

Anyway, on what was probably the last very warm day of the year, we broke
out the chalk one last time, and did this on the front steps.

Then we all went for a walk and when we came back, it was such a fun surprise - at least for me. The kids totally remembered doing these. I didn't, I'm not so good at remembering things these days, so I was all "wow, look at the steps! So fun! Oh yeah, we did that before..." I'm just happy when I come home from a walk with all the kids
accounted for.
Isn't it so much better when chalk drawings are drawn in white chalk first?
I don't know why I never thought of that before.
If you like what you've read, please leave a comment!
 
 
It's amazing what you can accomplish during a one hour naptime.
Here is our succah before:
And here is our succah after.
I'm about halfway through, but I don't know if I will remember to take another picture later on.

The only problem I can forsee is that I decorated before the kids brought home this year's stash from school. We'll have to shift things around when they bring home their bags of decorations tomorrow, but at least, for now, I am ahead of the game.

Thanks for reading! And if you liked what you saw, please leave a comment!
 
 
The morning after - Yom Kippur, that is. The day dawns completely anew
when you can wake up and brush your teeth. Such a simple thing, yet it's
probably the one thing that makes you human enough in the morning to engage with
other humans. You can wear pajamas all day and stick a baseball cap on your mop
of unwashed hair and you will still have friends. But don't brush your teeth,
and forget it. Nobody will talk to you. So I guess that brushing teeth is really
the first beautiful mitzvah (or good deed) one can do, bein adam
l'chaveiro*
, after Yom Kippur.

Sunday was a busy day. By 9am, we had four batches of  challah dough rising
on the counter. We should be good for challah until the week after
Succot. I feel good just saying that. And I also feel good because the last dish
that I used to prepare for Yom Kippur was washed by 9:30am which meant that we
were full steam ahead to Succot by 9:35am. 
The two main accomplishments yesterday were the baking of the challah and
the baking for the teachers. I only baked enough challah for the first three
days of Succot. The rest of the dough was shaped, frozen and slipped into
freezer bags to be baked at a later date. I have never done that before. I
usually bake all the dough and freeze baked challah but it was so hot out
yesterday and I refuse to turn the air conditioner on in October so one batch in
the oven was enough. And besides, there was a lot of cake baking to do and not
that much time.

To bake the frozen challah next week, I believe all I have to do it take
them out of the freezer, let them defrost a little and bake, possibly for a
little longer than usual. I just hope they don't lose their shape while they are
defrosting. I guess we'll find out next week.
Picture
We didn't use all of these, but we were close.
On to the baking. Several years ago - when I only had one child in school -
I thought it would be a nice idea to bake something for the teachers before Rosh
Hashanah, something like an apple pie. That year there were three teachers. The
following year, with two kids in school, the number of teachers jumped to six,
but still manageable. Last year, we baked before Succot and gave out treats to
nine teachers, making pumpkin bread, a big hit. This year, I have three kids in
school. Care to guess how many teachers there are? You won't be able to and I
know that because I counted the number of teachers seven times before allowing
myself to understand that there are 14 wonderful people who teach my children. 
 
Fourteen. What to do? And what to bake? After agonizing (really, I agonized) I decided to go with an chocolate-chocolate-chip-applesauce cake.
It's a quick and easy recipe and did not involve peeling any apples or opening
any sharp cans of pumpkin as recipes of years past required.
Picture
Messy messy mixer with kiddies.
This recipe comes from the mom of the girl who was one of my besties in
elementary school. We have been out of touch for ages and recently reconnected.
Her mom used to make this all the time and my friend was sweet enough to share
the recipe. I have no idea what the real name of the cake is, so we'll go with
Old-Time-Bestie's-Applesauce-Cake.

Here it is:
1 stick margarine
1 3/4 c sugar
1 lb applesauce
2 c flour
2 eggs
3 T cocoa
6 oz choc chops
1/2 tsp cinnamon
1 1/2 tsp baking soda

Cream the margarine and sugar. Add the rest of the ingredients and mix
well. If you are baking one cake, pour the batter into a 9x13 inch pan and bake
at 350 degrees for 45 minutes.

If you are me and baking 14 cakes, you will make the recipe five times and
divide the batter among 15 pans (the pans came in sets of three). The pans were
rectangles, about 7"x4", possible a drop smaller, but I don't think so. Bake the
pans for 30 minutes each, testing the cake after 25 minutes. Not sure why but
some pans were done faster than others but I'm pretty sure that's a function of
my oven and not a function of the recipe.

Allow the pans to cool, cover them and come back tomorrow to see how we
wrapped them all up.

*Literally, between man and his friend.
Thanks for reading! And if you liked what you saw, please leave  a comment!
 
 
Picture
Back in the summer when we started planning the kid's birthday parties, we
made some decorations. Very simple, very fast and very re-usable, which is what
we like most in a decoration.

Everyone knows how to make party streamers. Cut strips of colored paper and
staple or tape the first one into a circle and just link the next circle to the
first. Simple. Easy. Straightforward. We always make these for birthday parties
and we always make these for our Succah. Every. Single. Year. And it was getting a
little old. Either they ripped before/during/after the party or they ripped
before/during/after Succot - or more likely, got rained on and fell apart, not
to mention the color draining right out of the colored paper and onto the
tablecloth.

There had to be a better way. And there is! We made these chain link party
streamers using colored craft foam, the same foam that is used to make the
Foamies letters and shapes that kids love to stick everywhere. The foam I used
came in sheets and was about $6 for a package of 40 large sized sheets, very
affordable. And I tested it in the sink, very waterproof.
Picture
I cut the sheets into strips, cutting the short side, so each sheet yielded a good
10 strips. Then the kids decided what patterns we would use, what color would go
next and they handed me the strips, I stapled and an hour later we had 5 huge
chains.

We used them for all our parties this summer and they are now safely packed
away in the Succah decorations bin in the basement, awaiting their next
mission.
Picture
Thanks for reading! And if you liked what you saw, please leave  a  comment!
Picture