Picture
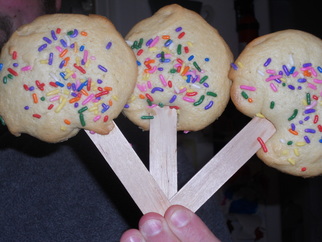
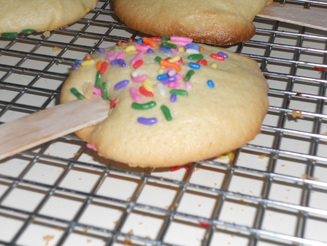
What do you get when cookies and lollies have a playdate? You didn't need me to tell you - you got it all by yourself - cookie lollies.
Gather together
5 eggs
1 and 1/2 cups oil

1 tbsp vanilla
1 tsp lemon juice

1 and 3/4 cup sugar
4 and 3/4 cup flour

1 and 1/2 tsp baking powder
and 1 tsp salt. 
 

Preheat the oven to 400 degrees.
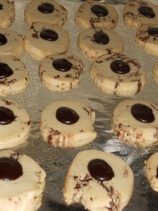
Mix all the ingredients on medium until, well, until it's all mixed. Drop by tablespoonfull onto a greased cookie sheet. Stick a popsicle stick/tongue depressor into each mound of dough. Sprinkle with chocolate chips, sprinkles, coconut, whatever and bake for 13-15 minutes until the bottom of the edges start to get slightly brown. Cool and eat.  

This recipe yields about 20 large cookie lollies.


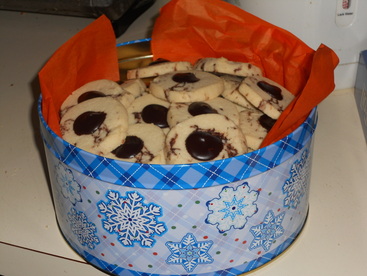
Cookies on a stick. Not very original, I know. But they're new to my kids, and today, that's all that mattered.
 
Picture
 
 
Snow days equal baking - alot. We assembled everything we needed - mixer, ingredients, measuring cups, aprons, but wait, we needed chef hats, decided my children. So chef hats we made.
Do they look just like chef hats? No.
They kind of look like there is a chazan/pope thing going on, but who cares, cause the kids are happy.  

And this is what we did.
1. Cut construction paper into thirds, lengthwise. Use two of the strips to make a crown the size of your child's head. Staple the strips to make a striaght line. Just don't staple it into a round crown shape yet because first they will color the strips. This took a good half hour as they drew pictures of all the foods that a chef can cook. This is very good.
 
Picture
2. When the coloring is done lay the strip flat on a table, colored side down. Using the long sides of two pieces of tissue paper, (you'll probably only need one and a half pieces of tissue paper unless your kid (or husband - see below) has a really big head) and some masking tape, tape the tissue paper to the strip of construction paper. Then tape down the seams of tissue paper to each other so that when you lift up the whole contraption it's all in one piece.
Picture
3. Close the crown, using staples, glue or tape. Close the tissue paper seams by sticking your hand inside the crown and taping the ends together.  

4. Put the hat on the kid's heads and kind of push the tissue paper down and then back up in a poofy chef hat manner. This is where the chazan/pope look comes in. (One kid insisted that his colored strip go on the inside, but only insisted this after I taped the whole thing together. This kind of worked out well because now you can see what the hat looks like inside out).
Picture
Picture
Picture
5. Bake. Eat. Watch TV. Play in the snow. Finish five year old's book report. Oh, look, it's time for dinner-bath-stories-bed! Smile.
 
 
Today: Blizzard. Tomorrow: Snow Day.
What to do to entertain the kiddies for two days straight? Hmmm? Good question.
So I'm not at all sure yet what we will be doing later, but our first Operation Blizzard project is done.
We made friends.
Paper friends.
And now that they are all hung up, they make the mantle look so happy. We have a happy mantle. You too can have a happy mantle. Just do what we did. Here's how.
Step 1: Fold the long side of a legal size or larger white paper in thirds or even quarters.

Step 2: Draw a basic picture of a person - kind of like a gingerbread man and cut it out, making sure not to cut the edges that join the gingerbread people's hands together. Essentially, we made a paper people chain.
Picture
Step 3: Hand them to your kids, along with some markers, stickers and crayons and let them go to town.
Picture
Step 4: Once they were done, each child chose three pieces of colored paper and I stapled them together to form a background for their paper people chain. The kids then glue-sticked their people to their colored paper.
Picture
Step 5: Add more stickers, have the kids write their names, spend a few minutes spelling out all the other words they want to write, have a coffee, whatever. The point of this step is to make the project take a little longer. 
Picture
Step 6: Hang the happy people on the mantle and smile.   
Picture
All in all, this took about 45 minutes. Working for 45 minutes is a long time, which can only mean one thing. Snacktime. 
 
 
So I used to bake and decorate cakes as a small (tiny) home business. People would call, order a cake, I'd make it, they'd ooh and ahh and I'd feel proud of myself. It was a win-win for everyone. And then I had one kid and I stopped taking many orders. Then another child came and I took even fewer orders. Then baby number three showed up and I really only baked for good friends who were in a bind. And once baby #4 arrived, I pretty much stopped decorating alltogether. But then a couple of weeks ago, a really nice guy in the neighborhood asked if I could please make a cake for his wife's 40th birthday - and he asked so nicely and is just generally such an all around good, sincere person, that I couldn't really say no. And truth is, I was kind of excited about taking out my cake-decorating toolbox again. We hadn't spent much time together in a long while and I was eager to catch up. I hoped it wouldn't be weird or anything. 

Picture
So out came the pink toolbox, from its shelf in the laundry room. What? You don't keep kitchen utensils in the laundry room?

Anyway, I opened it up, only to find that all my gel colors for tinting frosting were expired. Hmmm, so it'd been that long. But not a problem - this called for a quick trip to AC Moore. YIPPEE! Except that I needed to go during the day, so I had to take the girls along. So a little less yippee, but still, a big hooray, but with no exclamation mark.  
  

The cake requested was a super chocolatey cake with a mocha filling and a chocolate fudge ganache on top. Oh, and the Hebrew letter "mem" on top of the cake, because the numerical value of "mem" is forty. I tried to sell the guy on a heart or a flower or pretty much anything other than putting his wife's age on top of her cake, but he was insistent. Always listen to the customer.

So to start, I baked two 8" round chocolate cakes. Any chocolate cake recipe will do, as long as it is somewhat firm. I used another recipe, but a great, easy cake to make is to take a chocolate duncan heinz cake and add a box of chocolate pudding mix to the cake mix, along with 4 eggs, 1/3 cup oil and 1 cup water. Divide the batter evenly between the two pans and bake.    

Here is the finished  cake:
Picture
After the cake comes out of the oven, allow it to cool and turn it out onto a cooling rack. Once it has cooled all the way, trim the rounded tops off the cake, like this:
Picture
While the cake is cooling, make the filling.
I used this mocha frosting recipe:
1/2 cup room temperature margarine
1/4 tsp salt
6 tbsp cocoa powder
2 tsp vanilla
6 cups powdered sugar
12 tbsp coffee   

Cream the margarine, vanilla and cocoa. Add the salt, sugar and coffee and beat until light and fluffy. Either use right away or refrigerate it in a resealable container for a week.  

The next step is to fill the cake. Place one of the cake layers, cut side up, on a cardboard round that is not much bigger than your cake. You can hold the cake in place with a dollop of frosting between the cake and the cardboard.  

With an offset spatula, spread half of the frosting onto the cake layer, spreading it into an even layer. Top it with the second layer of cake, cut-side down.
Picture
Use the rest of the frosting to crumb coat the cake. And what does this crumb coat mean? It means to lightly frost a cake, essentially sealing in any stray crumbs so that crumbs do not get mixed into the final frosting layer.
Picture
Stick the cake in the freezer for about half an hour or until the crumb coat feels firm to the touch. While it is in the freezer, make your chocolate fudge ganache. Ganache is probably the easiest way to cover a cake, you pretty much can't mess it up.  

Chocolate Ganache:
16 ounces of Rich's Whip
18 ounces of bittersweet chocolate, chopped finely   

Pour the Rich's Whip into a small pot. Bring the Rich's Whip to a simmer, not a boil. Pour the Rich's Whip over the chocolate and cover the bowl with a towel for five minutes, allowing the chocolate to melt. When the five minutes are up, mix it with a spoon until smooth. Allow the ganache to cool to room temperature, stirring it every so often to make sure it doesn't become too thick to pour.

Remove the cake from the freezer, place the cake on a cooling rack set over a jelly roll pan (to catch the drips) and slowly pour the ganache over the cake, using the back of a spoon or a small metal spatula to gently push the ganache over the side. If the whole cake does not get covered on the first go-round, wait until the ganache layer has set and pour a second layer. Don't worry if the bottom section of the cake isn't beautiful because you are now going to cover your tracks by pressing either sprinkles or shaved chocolate or cookie crumbs into the ganache as a pretty cover for the lower edge of the cake.  

This is what it will look like:
Picture
To make the chocolate "mem" or really, whatever shape you like, for the top of the cake, follow these directions:

1. Draw or print out whatever shape you are trying to recreate, in the size that you would like it to be.

2. Turn it over and with a marker, outline your shape on the back of the paper.

3. Still turned over, tape the paper to the counter.

4. Tape a piece of wax paper over the first paper.
Picture
5. Melt chocolate in a bowl in the microwave, at 30 second intervals.

6. With a medium-sized clean (and unused for paint) paintbrush - I use a foam brush - paint your design onto the wax paper, following the lines of your drawing. Remember, you will be seeing - and painting - the image backwards because once the chocolate had hardened and the wax paper is peeled off, the design will be flipped over and the flat side of the chocolate will be face up - and professional looking.
 
7. Finish painting the design and let dry on the counter until firm.
Picture
8. Carefully peel it off the paper and flip it over. Using the rest of the melted chocolate, paint a very thin layer on the flat side of the design and immediately sprinkle with the colored sugar of your choice and allow to dry.

9. Using a small amount of frosting, just the tiny amount that is probably left in the bowl, adhere your design to the top of the cake.
Picture
Package your cake in a cake box (also from AC Moore) and you're good. No need to refrigerate, the ganache seals the cake and keeps it fresh for a weirdly long time.  

Deliver your cake and come home to clean up the kitchen.

Sigh as you look around and remember why you don't do this craziness too often.
 
 
Contrary to what it may seem, this is not a cooking and/or recipe sharing blog - and yet, I seem to find myself posting these kinds of thing alot lately. We still craft, but for some reason, we seem to be spending a lot of time in the kitchen, creating, these days. I wonder if it's because it's just so darn cold in the house that we seem to be gravitating towards the oven. Hmmm.  

So each year around this holiday time my husband likes to give a little something to the maintenance and security staff at his school. Although those two categories are decidedly different, they share an office so we can kind of lump them into the same category, for gift-giving purposes. Also, my kids just love all these guys, and really, the security guard at the preschool entrance it just great. He has taken the time to know each child's name and more importantly, which child belongs to which mommy. Not sure he knows all the dads, but they don't pick up that often, so anyway...  

The gift-giving in our world was a little less extravagant, shall we say, than in previous years. So this year, instead of buying something, we baked a little something called Chinese cookies. They are made with shortening and are very (very) tasty. But they are not something that I keep around the house because, like I said, they contain shortening and I try to steer clear of trans-fat inside the house. 
Picture
So the cookies were mixed, baked and delivered on Wednesday and to my great relief (I get very nervous when I bake for other people) they were a huge hit. Whew!   

I wanted to post the recipe but I can't seem to find it anywhere. It wasn't in a cookbook, it was on an index card...  Oy. If I find it, I'll post. But here they are, all packaged and ready to go on their merry-holiday-happy-making way. 

Picture
 
 
I am continually amazed/astounded/horrified by how much paper my kids bring home from school. Mulitply their load by 16 kids per class. Multiply that by a good 150 days of school a year and that, my friends, is a big number. Not sure what it is, but I do know that that's a forest right there. I can pretend to be outraged by all the waste and non-recycling and greenhouse global warming whatevers, but I won't. My main concern here is my kitchen - and all the clutter these papers make on my counters.   

My kitchen essentially has three counters, although if I am being totally honest, two of the counters are joined together in a U-shape -and the part that juts out into the center of the room is called The Peninsula. At least, that's what we call it. It can also be called a breakfast bar or just as easily, the-stupidly-placed-counter-that-takes-up-tons-of-floor-space. Whichever you prefer. There is also another small counter, which we call The Small Counter, where these papers tend to congregate when The Peninsula is full.  
Picture
To remedy the problem of the pile two years ago, I just threw everything out that didn't have my kid's handprint on it. He was three and generally didn't even realize he had brought home any projects in his backpack. 

Last year my paperload doubled as two kids went to school. So last year I bought each kid a super-large binder from Staples, decorated the cover with their names and grade and proceeded to punch holes in everything they brought home and stored them in these binders. Lovely, really a lovely idea, memories and all that. That lasted for about two months. Then I kinda just started sticking stacks of papers into the binders without punching holes and now, many months into a new school year, those last-year binders are in Shoprite bags in the attic, with the papers from December through June just stuffed into the bags, no holes, no order, nothing.   

This year, I was not looking to add to my collection of things shoved into Shoprite bags in the attic, so I needed to find a different tactic. This year, as they bring home their mounds of stuff each Friday, we all look at everything together. We ooh. Then we ahh. Then we decide what we must absolutely keep because we worked so hard on it and it's so beautiful, mommy. Then we count how many of these stunning papers there are between the two boys, because our maximum weekly paper allowance is eight, in total, between the two kids.

Picture
Picture
Why eight? Excellent question. Eight, because if you count the letters in PROJECTS, there are eight letters. Go on, count. It's okay if you don't believe me right away. Okay, now that we are all on the same page, I will explain further - we made a hanging display where the kids can showcase their artwork. We strung a string (say that ten times fast) across one of the windows in the living room and we decorated clothespins so we can attach their projects to the string. And there you go, a rotating exhibit of their best work. And after a week, if anyone brings home anything they feel is worthy of hanging up, they can exchange it with one of their lovely submissions from the previous week. Everything else goes in the garbage. Cruel? Maybe. Heartless? Probably. But dangit, I can see my counters, and that's what counts. 

Picture
To construct your own lovely clothespin hanging thing, here is what we did. 
1. Cut a piece of string a little longer than the width of your window. Tie the string to either end of your curtain rod. If you don't have a curtain rod, you can hang the "eye" part from a hook and eye lock on either side of your window molding and tie the string to those.  

2. Gather eight clothespins, some scrapbook paper and modge podge. Measure and trace the clothespins. You can just measure and trace one and use that template for all of them. I can say that so nonchalantly because I learned my tracing lesson the hard way.  

3. Modge and podge those clothespins. Let them dry.  

4. Do the same thing to your tiny wood letters that you just happen to have around the house. We spelled out PROJECTS but you can spell anything, like STUFF or LOOK AT ME or even YOUR KID'S NAME. Again, trace the letters (in this case, unlike in the clothespin case, you should probably trace each letter on its own). 
 

5. Hot glue the letters to the clothespins. Let them dry.  

6. Hang them up and wait for your kids to come home and notice their awesome new Art Project Central. Keep waiting cause it's been an hour since they came home and not one of them noticed the string hanging across the window. Point it out to them and watch as their little glazed eyes move slowly from the TV to the window and back to the TV, not quite acknowledging your presence.  

7. Hang up some of their projects. Once the projects are up, they'll love it. And if they don't, whatever, cause again, the goal here was a clear counter and mine are clear(ish).
 
 
Laundry is probably the worst part of being a grown-up. Yeah, there are planes to catch and are bills to pay* and all that busyness but once you pay a bill, you don't have to pay it again for a whole month and once you miss a plane, you miss a plane. But laundry. It's just always there.   

Our friend Naomi, the one who made this painting and then we never heard from again because she moved to Australia (no really, she literally moved to Australia) always said that the curse of Chava is not what it seems. (She's a rebbetzin, so that would make this is an actual dvar torah that you can use to impress people) You see, the curse of Chava is not the actual labor of having a baby - it's the labor that comes after. Namely, all the laundry that said baby generates. Because if you think about it, laundry never ever ends. It can't. Unless the entire family is walking around totally naked, there are no sheets on any of the beds and all the bathrooms are in a sorry state of towelessness, the laundry will never be finished. Not even after you do five loads in one day, fold it and put it away. Because, lucky you, when everyone comes home, there will once again be a huge pile. And if it's in an actual pile, then you really are lucky. That never happens in my house. I find people in my family by following the trail of clothes.
Picture
Our laundry problems are manyfold. And in a very specific order, these are them:
1. the collecting of
2. the getting it downstairs
3. the switching the load
4. the getting it back upstairs
5. the folding of  
6. and the putting away of

So you see, we have many many problems and not many many solutions - because if we had those, we wouldn't have the problems. Laundry is like life, it's all cyclical. And for a bonus dvar torah, the gematria of laundry (lamed, nun, daled, reish, yud) which is 294 is equal to the gematria of Azarya (ayin, zayin, reish, yud, hey) which means Hashem helps. Well, it almost equals 294. Azarya actually equals 293, but that's okay cause you can add one for Hashem and you're golden. Because without Hashem's help the laundry would never get done. Deep, I know.
Picture
Sometimes the kids try to help. They like to pour detergent when no one asked them to, they enjoy bending the hangers out of shape and they find great joy in throwing dirty unmentionables at each other. So we try to confine their helping to step #5  - folding. And then this is what usually happens.   

Sometimes we put them to work picking all the tissue pieces off the clothes that have had the unfortunate happen to them - a cycle in the washer with a pair of sweatpants and pockets full of tissues. Probably dirty ones, otherwise why would they be in the pockets, ya know? So gross. And yet, almost impossible to remedy. So we just throw the whole load into the dryer and hope that the lint-getter-thing gets most of it. And the misbehaving kid has to pick the rest of it off. Nah, that's not really true. But I do make them pick up the tissue pieces off the floor after I make a nice pile of tissue pieces on the couch and someone slams into it and knocks it down. Not cool.  

So to end my story on a holy note for my fellow-laundry-doing-holy-sisters, I will throw one more weird gematria out there - the hebrew word for miracle, nes, is equal to 110. Oddly enough, the word for fold, chavak (chet, vet, kuf) is equal to the same number. So yes, getting the laundry folded is indeed a miracle. I'll be honest, I am not at all sure that the word chavak or fold is used when one would actually speak in Hebrew about laundry and its goings-on but that's okay cause I don't really speak Hebrew; I kind of feel like it might mean to fold, as to enfold someone or embrace them, but you know what, a warm sweatshirt straight from the dryer hugs you and makes you feel all warm and good, so fold, embrace, whatever, it's all laundry and I have to go do some.  

* Oh come on, it's from Cats in the Cradle. You know you were humming it just now, you just had no idea why.


Recycling is nice. We do it on a somewhat frequent basis, but I guess it depends on what your definition of recycling is. Does recycling just mean collecting all the plastic bottles and boxes from around the house or does it mean actually having said products land in a recycling garbage truck? Because really, we have the first part down, we're good at the collecting, not so good at the truck part though. Our main issue, I believe, is that the recyclables are not picked up every week. Wait, that's not technically true. The truck comes every week, on Wednesdays - before 5am, but who's counting? That truck makes more noise than a truck should and helpfully picks up either boxes or bottles. What they pick up rotates every week, and therein lies the problem. We are never quite sure what they will be picking up, so every Tuesday night turns into a not-so-fun-game of Which Recycling Can Should Josh Drag To The Curb This Week? The name of the game takes a really long time to say, but as will be shown in a minute, the game takes forever to play, as in, we've never stopped since we moved in, so all in all, it's a good name for the game.

Our game usually goes something like this:
Josh: I think tomorrow is recycling.
Me: Hmm.
Josh: Is it bottles or boxes?
Me: I have no idea. I'll look and see what everyone else put out.
At that point, I look out the window and see the guy across the street dragging a huge box to the curb.
Me: Boxes.
Josh: Okay, be right back. 
 

Josh will then drag our huge thing of boxes to the curb. It's usually very late by then and so we go to sleep.  

Enter: Stage Left. Chaos.
All of us leaving the house the next morning.  Everyone else's recycling is gone. Ours is still at the curb. Josh goes to check and the guy across the street now has an empty box at the curb. What happened? Perhaps, and I can't confirm this, but maybe the guy across the street was dragging a box of bottles to the curb? So it wasn't box day. It was bottle day. Again. Hmmm. Maybe I shouldn't be the one who looks out the window on Tuesday nights.

Just to be fair, the city does send out a recycling calendar at the beginning of the year. And it's not a small, easy-to-lose piece of paper. On the contrary, it's so huge that it's impossible to keep. Where would I hang it? The ceiling? So a few weeks into January, out that calendar goes, probably into the recycling bin, which would actually mean that we still have it out in the driveway, on the bottom of the pile of boxes that never gets taken. So really, we're not hobos. We would like to have a clear driveway. We just have recycling issues.  

So why am I sharing? Because since there will forever be mounds of broken down boxes in the house, I figured we'd put one to good use today.
Picture
My two-year-old has been clamoring to go to the mailbox, ever since she got her Chanukah coupon in the mail. But it's been like 20 degrees this week and walking to the car with the kids is quite enough cold for me, thank you very much. The mailbox is all the way at the end of the block. Not gonna happen. So instead, we made a mailbox.

And this is how.
Here is what you need:
1 extra large cardboard cereal box (the kind from Costco that holds two bags of cereal)
masking tape
scissors
blue paint, for your sake, washable
paintbrush
some paper to make a sign
an hour of time
Picture
1. Open all the seams on the cereal box and turn it inside out, so the brown inside of the box is now on the outside.
Picture
2. Tape the box back together, sealing the bottom of the box with tape. Use more tape than you think you need.
Picture
3. Use the scissors and stab the box 3/4 of the way up the front of the box. This hole will be the basis for the mail-slot.

4. Using your new hole as the starting point, cut a rectangle in the box, leaving the bottom line of the rectangle alone so that the mail slot can open and close.
Picture
5. Do the same thing on the back of the box, near the bottom so the mail can come out.

6. Tape the top of the box closed, but do it in a sort of tee-pee shape, almost like the roof of a house. You don't really have to do this part, sealing the top shut just like the bottom is sealed shut is fine, but it's cuter this way. I wanted to round out the top like a real mailbox but I couldn't figure it out.
Picture
7. Paint the whole box blue.
8. Let it dry. Everyone naps.
Picture
9. Print out/write the words MAIL and BOX on paper and glue it onto the front of the box.

10. If you're really crazy, like I am, you will then modge-podge the entire thing so that it is sturdier than a cardboard box has the right to be. If not, not. Don't forget, it's just a toy made from a box. If it breaks, no biggie.

11. Hand your kid some index cards and tell her she's now the mail-lady.

12. Sit on the couch and read a magazine. (I'm kidding Josh! I wouldn't do that. I will now make dinner while our child plays USPS. Really.)
Picture
And super-fun for all!
 
 
Have you ever wanted to throw up while cleaning a chicken? I do. Pretty much every Thursday night. There is really nothing more revolting to me, except possibly sticking my hands in ground meat. Sensory issues, anyone?  

And I'm the granddaughter of a butcher. I say that like it should help, but truth is, it probably made it worse. Until I got married and moved out of town and was forced to visit a butcher shop to get things other than free candy from my Zeidy, I was under the impression that chicken cutlets came cleaned and wrapped nicely in aluminum foil and just magically appeared in the freezer. That's how it worked in my mom's freezer. Zeidy was the chicken cutlet fairy. And I mean that in a good way. I wish I had a chicken cutlet fairy these days. And a steak fairy, but that's another story.  

If I'm going to be totally honest, my mom still brings me chicken cutlets, all cleaned and ready to go and sticks them in my freezer. But not often enough. Ma! We need more chicken!  

And since I am baring the chicken-stupidity part of my soul, I may as well admit that I didn't have clue how to make chicken soup before I got married. My grandmother always made it by the gallon and gave it out. But how? Since I was a little girl, I kind of always thought that maybe she squeezed the chicken. But how could that be? And how hard did she squeeze? And, ewww, I love chicken soup, but I don't wanna squeeze a chicken. And so I was floored, really floored when I learned that there was water involved. There, now my soul is bare. I feel much better.
Picture
So now why I am laying this all out there? Because just like my grandparents made things easy for their daughters-in-law, I like to continue the family tradition of easy. And so when my sister-in-law introduced me to this awesome salad dressing, which may or may not be sold exclusively at Costco, I knew that it was going to be part of my standard-one-dish-Shabbos-lunch-chicken-thing. The salad dressing is called Vidalia Onion Salad Dressing from Oak Hill Farms and is just so yummy, I could almost drink it. Whenever we have company and do "fancy" chicken, which for me is corn-flake-chicken, I use this salad dressing instead of eggs or mayo under the corn flakes. And company always asks for the recipe. I like that.   

And so when we don't have company, I pour brown rice into a really big rectangular pyrex, throw in some vegetables, like sweet potatoes and zucchini and onions, put the now clean chicken on top and pour this salad dressing over the whole thing. Add water for the rice, cover the whole thing with foil and bake at 400 degrees for 1 hour. Uncover and bake some more, until the chicken is cooked and appears to be roasted. And everyone eats - some people like rice and some people like vegetables and everyone likes chicken. And I like that there is only pan to wash after Shabbos.   

Oh yeah, the salad dressing works really well on salad too, but that's so boring.
 
 
So this Shabbos is kind of still like Shabbos Chanukah, just without the candles and oil and stuff, cause really, the house is still decorated, the menorahs are still out and the kids are still playing with their gifts.   

And the best gift the kids' received? 
The lego?
No. 
The Buzz-Lightyear guy?
No. 
The Sticky Mosaics?
Nope. 
The baby stroller that's nicer than the one I push?
No again?
The little kitchen that's nicer than my kitchen?
Good guess, but no. 
Picture
They got coupons. On the first day of Chanukah I mailed each kid a letter with a coupon inside, good for a trip to Dunkin Donuts, alone, with just mommy or abba. I figured whatever day they showed up in the mailbox would be the day they got to have that as a present. They were so super-excited to get mail, it was almost too funny to watch. Josh brought the mail in when he came home from work and made a huge deal out of how some people got mail and what could it be?!     

And the funny part is, I made the coupons on the computer and printed them out. Mailed them out and the whole thing cost me the price of three stamps, whatever that is. But even funnier is that the kids put their coupons on the fridge and look at then all the time, asking me to read it to them again and again, but so far not one of them has asked to go get a donut. And these are kids that would sell their baby sister for a donut. Are they not understanding the concept of the coupon? Are the coupons so pretty that they don't want to part with them? Do they not want to go get a donut with just me or Josh? I have no idea, but I am definitely filing this coupon idea away for next year.

Picture
And then there are the morahs. The school collects money and every teacher gets a nice gift card from the whole class. We usually give them something small anyway, just because, well, partly because I like to have an excuse to make cute things and partly because I am amazed at the lengths the teachers in this school will go for a kid, at least the teachers we have had so far.

Picture
Picture
So this year we were going to make chocolate lollipops. We had the chocolate, the lollipop sticks, the molds, the little lolly bags and the ribbon. We were set. I started making the lollipops the other day and set them on one of those metal cooling racks used for cooling cakes. So when the lollies came out of the fridge and popped out of the molds, they were lined up on the cooling rack on the dining room table, like lollipops on parade. I knew how many lollies I needed and I was counting as I was going. And yet there seemed to never be enough chocolates. What the heck was going on? Maybe I really was losing it? And then I saw a chocolate handprint on the wall and it all came together. Every time a kid walked by the dining room they swiped a lolly. They didn't eat them all, but they ate enough so that even if I made lollipops with every morsel of chocolate I had in the house, I still would not have had enough to fill the bags I bought for the teachers.

And now Chanukah is over and the thrill of melting things is gone. So morahs, we're sorry, we love you - just know your lollies were very tasty. We hope you still love us. And just think, Purim will be here soon. We'll catch you then.