So I used to bake and decorate cakes as a small (tiny) home business. People would call, order a cake, I'd make it, they'd ooh and ahh and I'd feel proud of myself. It was a win-win for everyone. And then I had one kid and I stopped taking many orders. Then another child came and I took even fewer orders. Then baby number three showed up and I really only baked for good friends who were in a bind. And once baby #4 arrived, I pretty much stopped decorating alltogether. But then a couple of weeks ago, a really nice guy in the neighborhood asked if I could please make a cake for his wife's 40th birthday - and he asked so nicely and is just generally such an all around good, sincere person, that I couldn't really say no. And truth is, I was kind of excited about taking out my cake-decorating toolbox again. We hadn't spent much time together in a long while and I was eager to catch up. I hoped it wouldn't be weird or anything.
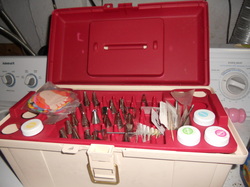
So out came the pink toolbox, from its shelf in the laundry room. What? You don't keep kitchen utensils in the laundry room?
Anyway, I opened it up, only to find that all my gel colors for tinting frosting were expired. Hmmm, so it'd been that long. But not a problem - this called for a quick trip to AC Moore. YIPPEE! Except that I needed to go during the day, so I had to take the girls along. So a little less yippee, but still, a big hooray, but with no exclamation mark.
The cake requested was a super chocolatey cake with a mocha filling and a chocolate fudge ganache on top. Oh, and the Hebrew letter "mem" on top of the cake, because the numerical value of "mem" is forty. I tried to sell the guy on a heart or a flower or pretty much anything other than putting his wife's age on top of her cake, but he was insistent. Always listen to the customer.
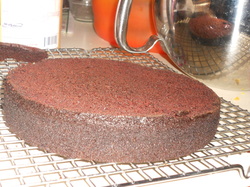
So to start, I baked two 8" round chocolate cakes. Any chocolate cake recipe will do, as long as it is somewhat firm. I used another recipe, but a great, easy cake to make is to take a chocolate duncan heinz cake and add a box of chocolate pudding mix to the cake mix, along with 4 eggs, 1/3 cup oil and 1 cup water. Divide the batter evenly between the two pans and bake.
Here is the finished cake:
Here is the finished cake:

After the cake comes out of the oven, allow it to cool and turn it out onto a cooling rack. Once it has cooled all the way, trim the rounded tops off the cake, like this:
While the cake is cooling, make the filling.
I used this mocha frosting recipe:
1/2 cup room temperature margarine
1/4 tsp salt
6 tbsp cocoa powder
2 tsp vanilla
6 cups powdered sugar
12 tbsp coffee
Cream the margarine, vanilla and cocoa. Add the salt, sugar and coffee and beat until light and fluffy. Either use right away or refrigerate it in a resealable container for a week.
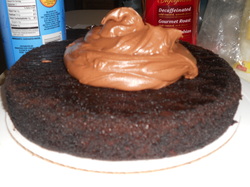
The next step is to fill the cake. Place one of the cake layers, cut side up, on a cardboard round that is not much bigger than your cake. You can hold the cake in place with a dollop of frosting between the cake and the cardboard.
With an offset spatula, spread half of the frosting onto the cake layer, spreading it into an even layer. Top it with the second layer of cake, cut-side down.
I used this mocha frosting recipe:
1/2 cup room temperature margarine
1/4 tsp salt
6 tbsp cocoa powder
2 tsp vanilla
6 cups powdered sugar
12 tbsp coffee
Cream the margarine, vanilla and cocoa. Add the salt, sugar and coffee and beat until light and fluffy. Either use right away or refrigerate it in a resealable container for a week.
The next step is to fill the cake. Place one of the cake layers, cut side up, on a cardboard round that is not much bigger than your cake. You can hold the cake in place with a dollop of frosting between the cake and the cardboard.
With an offset spatula, spread half of the frosting onto the cake layer, spreading it into an even layer. Top it with the second layer of cake, cut-side down.
Use the rest of the frosting to crumb coat the cake. And what does this crumb coat mean? It means to lightly frost a cake, essentially sealing in any stray crumbs so that crumbs do not get mixed into the final frosting layer.
Stick the cake in the freezer for about half an hour or until the crumb coat feels firm to the touch. While it is in the freezer, make your chocolate fudge ganache. Ganache is probably the easiest way to cover a cake, you pretty much can't mess it up.
Chocolate Ganache:
16 ounces of Rich's Whip
18 ounces of bittersweet chocolate, chopped finely
Pour the Rich's Whip into a small pot. Bring the Rich's Whip to a simmer, not a boil. Pour the Rich's Whip over the chocolate and cover the bowl with a towel for five minutes, allowing the chocolate to melt. When the five minutes are up, mix it with a spoon until smooth. Allow the ganache to cool to room temperature, stirring it every so often to make sure it doesn't become too thick to pour.
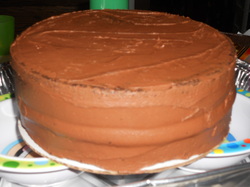
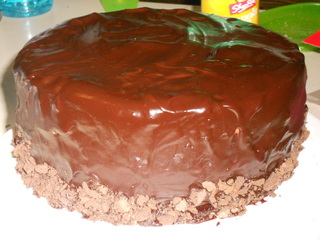
Remove the cake from the freezer, place the cake on a cooling rack set over a jelly roll pan (to catch the drips) and slowly pour the ganache over the cake, using the back of a spoon or a small metal spatula to gently push the ganache over the side. If the whole cake does not get covered on the first go-round, wait until the ganache layer has set and pour a second layer. Don't worry if the bottom section of the cake isn't beautiful because you are now going to cover your tracks by pressing either sprinkles or shaved chocolate or cookie crumbs into the ganache as a pretty cover for the lower edge of the cake.
This is what it will look like:
Chocolate Ganache:
16 ounces of Rich's Whip
18 ounces of bittersweet chocolate, chopped finely
Pour the Rich's Whip into a small pot. Bring the Rich's Whip to a simmer, not a boil. Pour the Rich's Whip over the chocolate and cover the bowl with a towel for five minutes, allowing the chocolate to melt. When the five minutes are up, mix it with a spoon until smooth. Allow the ganache to cool to room temperature, stirring it every so often to make sure it doesn't become too thick to pour.
Remove the cake from the freezer, place the cake on a cooling rack set over a jelly roll pan (to catch the drips) and slowly pour the ganache over the cake, using the back of a spoon or a small metal spatula to gently push the ganache over the side. If the whole cake does not get covered on the first go-round, wait until the ganache layer has set and pour a second layer. Don't worry if the bottom section of the cake isn't beautiful because you are now going to cover your tracks by pressing either sprinkles or shaved chocolate or cookie crumbs into the ganache as a pretty cover for the lower edge of the cake.
This is what it will look like:
To make the chocolate "mem" or really, whatever shape you like, for the top of the cake, follow these directions:
1. Draw or print out whatever shape you are trying to recreate, in the size that you would like it to be.
2. Turn it over and with a marker, outline your shape on the back of the paper.
3. Still turned over, tape the paper to the counter.
4. Tape a piece of wax paper over the first paper.
1. Draw or print out whatever shape you are trying to recreate, in the size that you would like it to be.
2. Turn it over and with a marker, outline your shape on the back of the paper.
3. Still turned over, tape the paper to the counter.
4. Tape a piece of wax paper over the first paper.
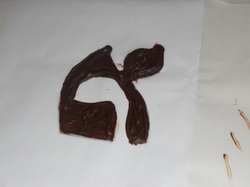
5. Melt chocolate in a bowl in the microwave, at 30 second intervals.
6. With a medium-sized clean (and unused for paint) paintbrush - I use a foam brush - paint your design onto the wax paper, following the lines of your drawing. Remember, you will be seeing - and painting - the image backwards because once the chocolate had hardened and the wax paper is peeled off, the design will be flipped over and the flat side of the chocolate will be face up - and professional looking.
7. Finish painting the design and let dry on the counter until firm.
8. Carefully peel it off the paper and flip it over. Using the rest of the melted chocolate, paint a very thin layer on the flat side of the design and immediately sprinkle with the colored sugar of your choice and allow to dry.
9. Using a small amount of frosting, just the tiny amount that is probably left in the bowl, adhere your design to the top of the cake.
9. Using a small amount of frosting, just the tiny amount that is probably left in the bowl, adhere your design to the top of the cake.

Package your cake in a cake box (also from AC Moore) and you're good. No need to refrigerate, the ganache seals the cake and keeps it fresh for a weirdly long time.
Deliver your cake and come home to clean up the kitchen.
Sigh as you look around and remember why you don't do this craziness too often.
Deliver your cake and come home to clean up the kitchen.
Sigh as you look around and remember why you don't do this craziness too often.
